Showing posts with label Sky Blue Ballgown. Show all posts

March 15, 2017

Inside & Out: 1830s Sky Blue Ball Gown

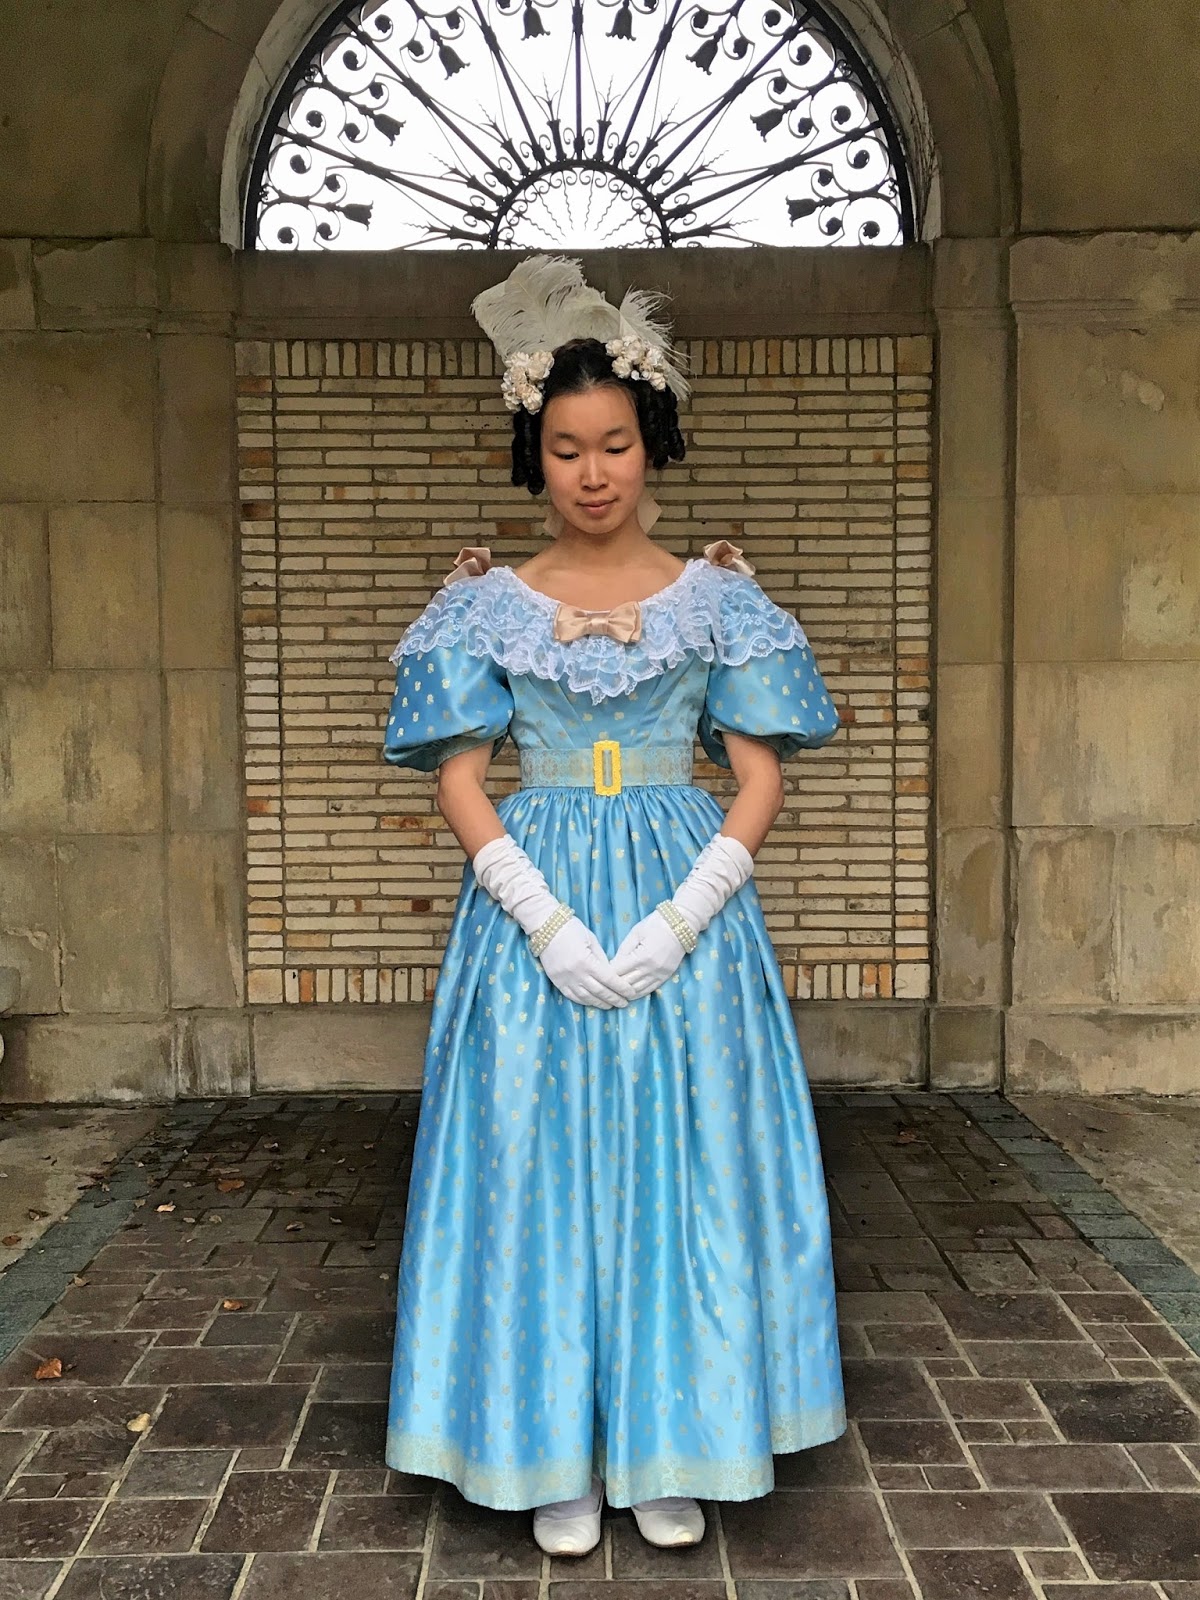
As the fourth and final part of the 1830s Sky Blue Ball Gown project, today's post will feature the construction details for the dress, accessories and wacky 30s hairdo photographed at our most recent shoot, here:  I Could Have Danced All Night.  

Photograph courtesy of Maria M.

The Dress

As always, I draw my inspiration from extant garments, fashion plates and period portraits (and photographs if applicable).  I wrote extensively about the sari fabric and inspiration behind this project, here, in the Project Planning Post, if you're interested.  Out of all of the sources, this portrait from the MET really spoke to me, and I drew on it for the sleeves, single lace flounce and use of white, contrasting piping at the neckline: 

Portrait of a Lady by Alvan Clark, ca. 1835
(Source: MET Museum, 38.146.3)

Constructing the grand ball gown that I imagined, however, was not easy to put it simply.  For nearly two months, the bodice sat in the U.F.O pile as I just couldn't figure out where to go with it...until winter break, when I knew it would be the perfect project entry for the Historical Sew Monthly remake, reuse and refashion challenge, since the fabric is a repurposed Indian sari.  Five days later, Maria and I were shooting the completed outfit:

1830s sky blue ball gown, front view.

The first step was to recut and refit the bodice, and attach the waistband which was fussy cut from the pallu of the sky blue and gold satin sari, which served as the fashion fabric.

Detail of bodice front, outside.

The bodice is lined with a sturdy cotton twill, and features two darts on each side.  The waistband needed to be stabilized, so I lined it with interfacing.  Also, I piped the neckline with white satin.  

Detail of bodice front, inside.

The second step and part that probably gave me the most trouble was patterning the sleeves.  They had to be recut several times before they would nicely lay over the sleeve supports.  

Sleeve detail from the outside,
notice the armseye is piped with the same satin as the neckline. 

The sleeves are lined with cotton organdy for extra support, and gathered onto bands, also cut from the sari's pallu and stabilized with interfacing.

Sleeve detail with a view of the interior.

Cotton twill tapes were added to secure the sleeve puffs at the armseye.  Overall, this project was very hand intensive.  I did machine the interior seams, but there was a lot of hand finishing and each seam needed to be hand overcast as the sari frayed terribly!

Armseye with tapes for the sleeve supports.

Tackling the skirt came next.  I did not have the heart to cut off the pretty border, so I spent well over an hour with a ruler, balancing the skirt.  The fabric was very slippery, so this was a tedious task.  The center back length is three inches longer than the center front to accommodate a small bustle pad.  After gauging the skirt with two rows of running stitches, the skirt was whipped to the edge of the waistband.

Skirt interior detail featuring two rows of gauging,
which were whipped to the edge of the waistband.

I also applied a deep hem facing from blue cotton, and was thrilled to make use of the sari border to finish the skirt.  

Hem detail depicting sari border and hem facing.

Keeping in line with the remake, reuse and refashion theme, I cut a straight length of net lace off an 1970s prom dress.  I played around, pinning and pleating the lace with the aid of my dress form until it laid just so - balanced longer at the center front and over the sleeves.  The pleats were then hand stitched in place, the raw edges whip stitched under, and then covered with a narrow lace trim, also salvaged from the prom dress.   

Neckline and lace details.

Finally, there was an end in sight as I stitched the hooks and eyes - both metal and thread - up the back of the bodice:  

Dress closures, including nine metal hooks
and a combination of both metal and thread eyes.

The completed ball gown, back view.

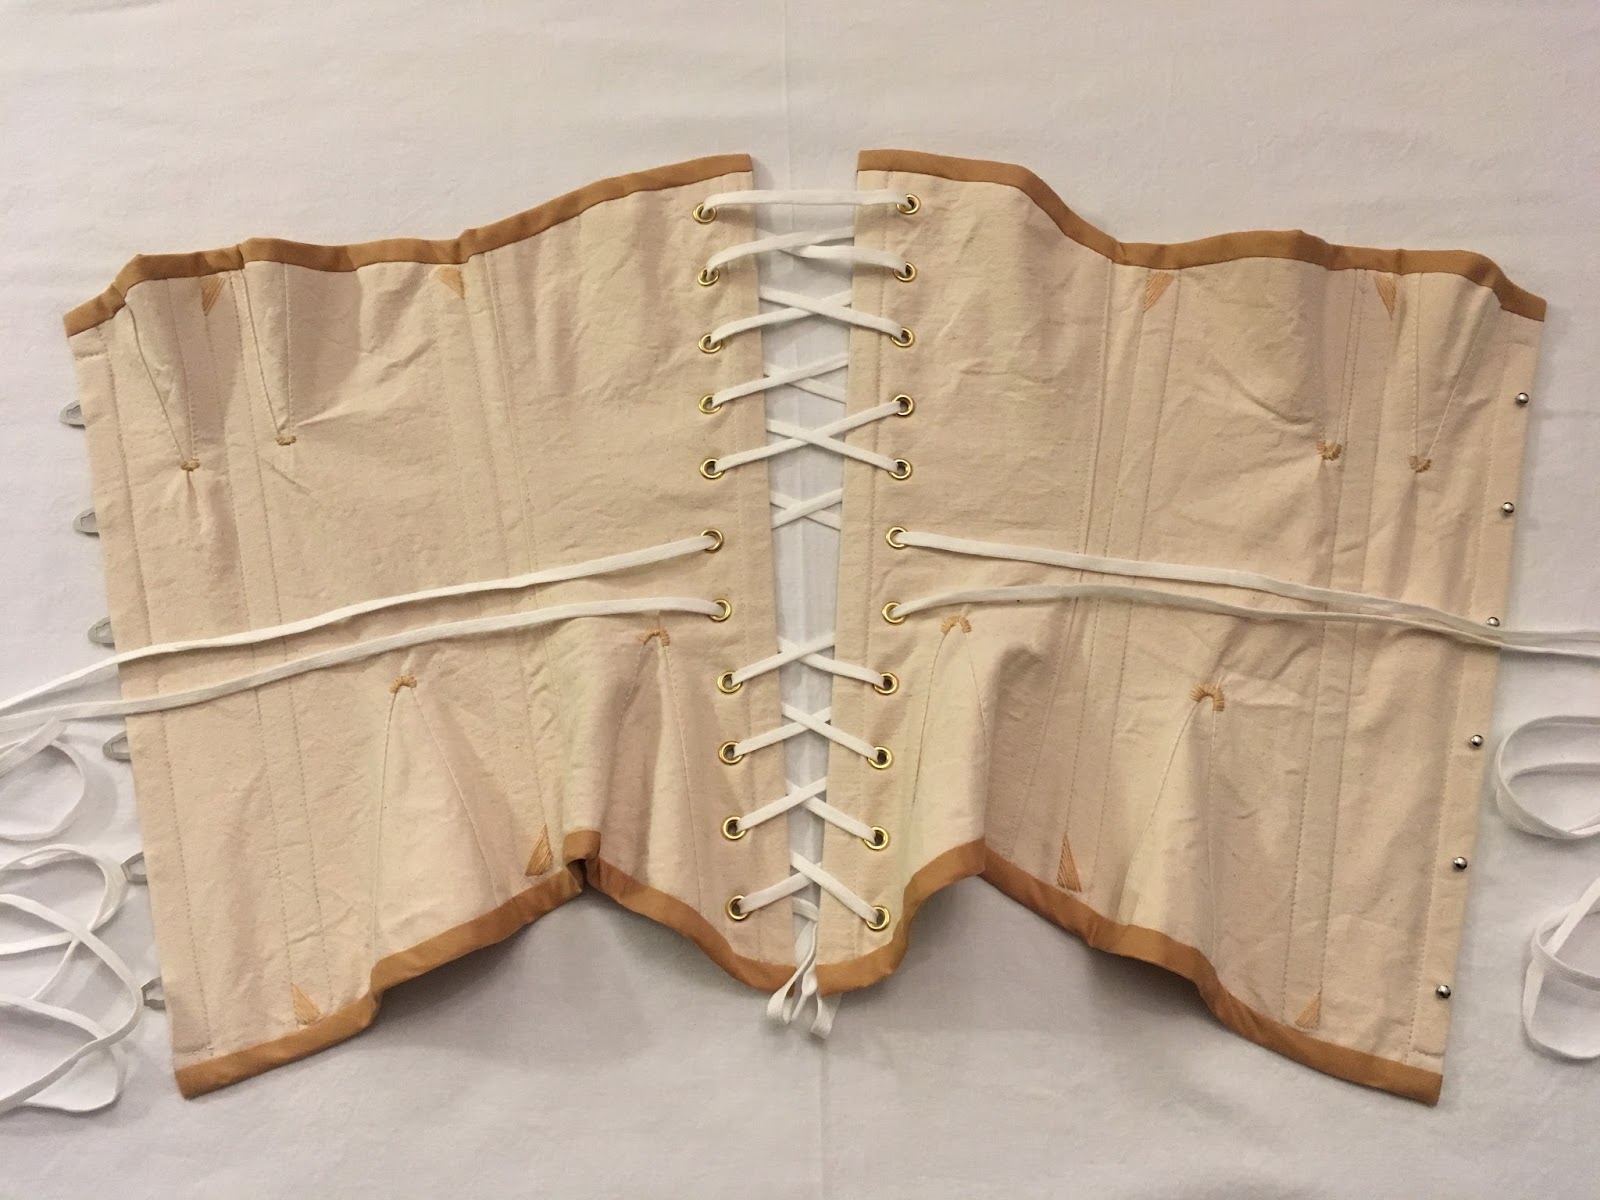
For the photo shoot, the completed ball gown was worn over a proper shift, the new corset and sleeve puffs (featured in this post), flounced bum roll, and three petticoats to achieve the early-1830s silhouette.  


The Accessories

No outfit would be complete without the accessories of course!  Vintage gloves, matching costume pearl bracelets, ribbons and a belt with a gold buckle accessorized the look.


Drawing again on period inspiration, and a little help from my two seamstress friends, Allison and Lydia, I added three bows to balance the look of the neckline.  Each bow was hand stitched from wired ribbon and secured with a metal pin backing.

The neckline and ribbon trim inspiration.
(Source: Pinterest)


The last piece I made was a matching 2" belt with a gold, reproduction slider buckle.  Cut also from the sari's pallu and interlined with both interfacing and cotton drill, the hand stitched belt closes with two hooks and thread eyes.  

Belt and reproduction slider buckle.

Back details of both the belt and a bow
showing the hooks and pin backs respectively. 


The Hair

Onto what is perhaps the most exciting and distinct part of 1830s fashions...the hairdos!  Bring on the towering plumes, flowers, ringlets, ribbons and all things ridiculously fun!  


A couple of months ago, I decided to dye my hair for the first time...the copper ombré style was fun at first, but nearly two feet of bleached and colored ends are not very period...so, I kept the roots and about a foot of hair my natural color.  Thus, a bit of creativity was required to disguise the copper...  

The complete hairdo, front view. 

I started with a braided bun, pinned in some ringlets and added the flower bunches (on combs) after this portrait:

Portrait of Grand Duchess Elena Pavlovna Romanova.
(Source: Pinterest)

Then, I bobby pinned the feathers and large bow, which hid the majority of my colored hair, to finish the look.  It was pretty straightforward, while looking very 30s, and oh so fun to wear!  

Hairdo from the side...if you look closely,
you can just see a bit of my colored hair.

The complete hairdo, back view.
The feathers and bow hid all of the colored hair perfectly!

All in all, regardless of the early struggles with the dress construction, I am so happy that Maria and I were able to see this project through.  My friend, the dressmaker, paid us the highest compliment by saying that this was her favorite of our projects.  I haven't stopped smiling, thanks to that and the overwhelmingly positive response on our Facebook page.  I so appreciate all of your support as the encouragement keeps me sewing - thanks for reading!  

February 28, 2017

I Could Have Danced All Night - 1830s Photoshoot

"'Whom are you going to dance with?' asked Mr. Knightley.
She hesitated a moment and then replied, 'With you, if you will ask me.'
'Will you?' said he, offering his hand."
~ Jane Austen, Emma


At long last, the 1830s sky blue ball gown is complete!  I began the project back in December (see the Project Planning post), but after several frustrations, set the pieces aside.  That was until this past week, which was February Break for college, when I realized that it would make the perfect entry for this month's Historical Sew Monthly Challenge: Re-Make, Re-Use, Re-Fashion!    

Worn over a proper shift, the new corset and sleeve puffs, flounced bum roll and three petticoats, the silhouette came together.  Vintage gloves, matching costume pearl bracelets, ribbons and a belt with a gold buckle accessorized the look.  And by far, the hairdo, with its towering plumes, flowers, ringlets and bow (all cleverly hiding my current copper ombré style), was my favorite part! 


The next step was to find a suitable location for the photo shoot.  For sure, I was envisioning a grand (passably-period-looking) staircase and the George Eastman Mansion was so kind to allow us to photograph inside!  In fact, the response could not have been more welcoming!  Several lovely people spoke with us, asking about the dress, and there were a lot of group pictures.  The two ladies that we conversed with in the interactive sitting room (pictured above) were among the most memorable.  I highly recommend a visit to the George Eastman Museum if you haven't already! 

Finally, I am so grateful to Maria, my sister and photographer, for all of her time and talent!  Without her, none of these photo shoots would be possible, and it is her artistic eye - despite the busy Saturday crowd, the rainy and overcast day - that brings my historical dress-up dreams to life.  A million thanks, Maria!  *All photographs courtesy of Maria M.*


Completed Project Shots 

I could have danced all night
And still have begged for more


I could have spread my wings
And done a thousand things
I've never done before


I'll never know
What made it so exciting
Why all at once
My heart took flight


I only know when he
Began to dance with me
I could have danced, danced, danced,
All night!


Even though it was raining outside, we decided to take a couple of shots in our favorite location as a just because...and I'm so pleased that we did since the sky blue sari fabric photographed spectacularly! 


Lyrics are "I Could Have Danced All Night" from My Fair Lady.  An in-depth look at the dress construction (and more info on the hair!) to follow...


Historical Sew Monthly Entry Details

The Challenge: February: Re-Make, Re-Use, Re-Fashion - Sew something that pays homage to the historical idea of re-using, re-making and re-fashioning. Turn one thing into another. Re-fit or re-fashion an old gown into something you would wear again. Re-trim a hat for a new outfit, or re-shape a modern hat to be a historical hat. Re-purpose the fabric from an old garment (your own or a commercial one) into a new garment.


My sky blue 1830s ball gown falls under the "re-purpose" category as the fashion fabric was originally a satin sari.  And, as a bonus, the lace frill was "re-used" from a 1970s prom dress! 

Material:  One sky blue and gold satin sari, cotton twill for lining, cotton organdy for sleeve lining, interfacing for interlining, white satin for piping, blue cotton for hem facing 

Pattern:  Drafted my own.  The sleeves were re-cut several times.  

Year:  Early-1830s

Notions:  Cotton cord for piping, re-purposed lace, metal hooks and eyes, ribbon and metal pin backs, thread and twill tape

How historically accurate is it?  Material-wise, not very...the burn test (unfortunately) confirmed that the sari is most likely poly, and the lace is only accurate for 1970...however, the overall cut, design and construction methods would be recognizable for the early-1830s.  So, 25%? 

Hours to complete:  Did not keep track, but too many!  This dress was very intense on the hand, and every seam needed to be overcast.  (Polyester ugh!) 

First worn:  For pictures! 

Total cost:  Well, the sari was a generous gift from one of my Aunt's "de-stashing," and most everything else had been bought for other projects or pulled from the stash...so I'd guess a very reasonable $25-$30? 


Finis.

January 31, 2017

HSM January Challenge: Firsts & Lasts

Oh hello, my poor neglected blog...it's me, your writer.  I may have dropped the ball on blogging this month, but I did sew some.  In fact, I just snapped a few pictures of my recently completed corset and giant sleeve puffs to serve as my January entry for the 2017 Historical Sew Monthly!  That's right, after a year off, I've decided it's time to rejoin the global sewing challenges, hosted by the Dreamstress.  (Click the link to join the fun!)


Part I:  The Corset

First, I must say a huge thank you to my good friend, Allison, for all of her assistance...from generously providing the pattern - Past Patterns #708, not to mention her apartment, to all of her encouragement and assurance that gussets without a seam are not as impossible as they look.  Though, it did take an entire afternoon to stitch all sixteen of those in (and out when they weren't behaving) haha!  

Laced and ready to wear!

The corset is made with two layers of cotton drill, bound with caramel colored bias tape and flossed with a matching DMC floss:


It features two bust gussets per side: (That's eight bust gussets total counting the inside layer)


A front and back hip gusset on each side:


A front opening busk and six bones, which, though less that I'm used to, provides ample support:


And laces up the back with size 00 grommets:  Which, by the way, took me three hours, two hammers, a pair of pliers, sandpaper and steel wool to punch.  I bought a really nice grommet kit from my favorite corset supplies supplier, and was uh a little disappointed...maybe next time I'll just hand stitch those eyelets... 


All in all, I am very pleased with the results.  Fit wise, it produces much more "lift" at the bosom than I expected, so I may cheat and use it for earlier-19th century purposes.  When I'm up to making another corset, I will have to remember to shorten the front...as I am having a little difficulty sitting with the length as it is now, hmm.  Regardless, it needs a good pressing, but the inside looks as nice as the outside, which makes me very happy! 


Part II:  The Sleeve Puffs

Much, much larger than the last pair with twill tape ties to secure them to the inside of my 1830s ball gown bodice...if it ever behaves so I can finish it:


Staple of the high fashion of the 1830s or not,
I still see a remarkable resemblance to croissants! 

Stockings, shift, corset & sleeve puffs.


And onto the entry details:

The Challenge:  January: Firsts & Lasts - Create either the first item in a new ensemble, or one last piece to put the final fillip on an outfit.

Material:  Corset - cotton drill;  Sleeve puffs - cotton muslin

Pattern:  Corset - Past Patterns #708 (1840's - 1880's Corset);  Sleeve puffs - drafted my own

Year:  Corset - according to the pattern, 1840s - 1880s;  Sleeve puffs - early 1830s

Notions:  Corset - 12" busk, 6 metal bones, thread, cotton bias tape, DMC embroidery floss, 8 yard lacing, size 00 grommets;  Sleeve puffs - cotton batting, thread, twill tape

How historically accurate is it?  They would both certainly be recognizable in their respective time periods...

Hours to complete:  Didn't keep track, but the sleeve puffs probably took an hour or two, while the corset took several days

First worn:  Not yet, but perhaps for pictures when I finish the chemise...

Total cost:  Didn't keep track for the corset, but I bought the drill, busk, boning, a new awl, lacing, grommets and grommet kit.  So, I'd say $100?  Sleeve puffs were made from the stash.


December 23, 2016

Project Planning: Sky Blue 1830s Ball Gown

At last, the fall semester is finito, so it's time to get back to sewing!!  And I'm very excited to share the first, new project of the winter season...something special...drum roll please...an 1830s ball gown made from a gorgeous sky blue and gold sari!  

Right side: sky blue with gold embroidery.
Underside in gold (left).

A couple of months ago now, one of my Aunt's "de-stashed" and sent us several boxes full of sewing supplies and fabrics.  It was just like Christmas, and, to my great delight, this satin sari all the way from India appeared.  Burn test (unfortunately) confirmed that it's most likely poly, but that doesn't take away from its gorgeousness!

The embroidered motifs of the body.
In its entirety, the sari measures a little over five yards.

A band of the pallu.

I had been saving the sari for a later project, until Ariana sent me this picture from the new mini-series about my favorite monarch, Victoria

 Jenna Coleman as the young Queen Victoria.
(Image via: DailyMail)

And then, I knew exactly what I needed to make next...a blue and gold 30s ball gown of my own!  So I turned to Pinterest to start gathering inspiration: 

Portrait of Amélie du Bois (1803-1891),
by Alexandre-Jean Dubois-Drahonet, 1821
(Image via: Christie's Lot 178)

Lucky for me, blue and gold seemed to be a period appropriate combination!  I will be modeling the sleeves and waist treatment after this portrait: 

Ann McCurdy Hart Hull (1790–1874)
Wadsworth Atheneum Museum of Art, Hartford, Connecticut
(Image via: Smithsonian)

And I found THE inspiration here:  This confirmed the use of a single, long lace flounce across the neckline and short, puffed sleeves. 

Portrait of a Lady by Alvan Clark, ca. 1835
(Image via: MET Museum, 38.146.3)

Lace flounce(s) seemed to be popular in the late-1820s and early-1830s especially over organdy or tulle over-sleeves: 

(Image via: Pinterest)

I plan to draft a two-dart bodice much like this portrait: 

Regina Daxenberger by Joseph Karl Stieler, 1829
(Image via: Pinterest)

Julie Grafin von Woyna by Friedrich von Amerling, 1832
(Image via: Pinterest)

Wow, no expense spared here - I bet that silver embroidery cost a royal fortune, not to mention those jewels! 

Dona Maria Cristina de Bourbon, Queen of Spain
by Vicente Lopez Portana, 1830
(Image via: Pinterest)

In examining period film representations, Jenna Coleman as the young queen in Victoria (which is a charming mini-series by the way) often sports the lace flounce and puffed sleeve style:

Jenna Coleman in Victoria.
(Image via: Tumblr)

Emily Blunt, also as Victoria, in one of my favorite period films, The Young Victoria, appears in the style:  Costumes by my one of my favorite designers, Sandy Powell.  It's like a frothy, lemon cake, I love it!!

Emily Blunt in The Young Victoria.
(Image via: Tumblr)

Once I finish my gown, I'll need to find a dance to wear it to!  

A Couple Dancing by Lionel Peraux
(Image via: Tumblr)

A French Soiree, 1819
(Image via: Black Tie Guide)

Time to get to work...

We ❤︎ Our Patrons

Like what you see here, and want to support future blogging and educational programming? Consider becoming a Patron - click on the button below to unlock exclusive content, bonus blog posts, and more! Every contribution makes a big difference, thank you!