June 20, 2017

Inside & Out: Regency Half-Robe

Well hello there, long time, no post!  Today we'll be discussing the inspiration behind and the construction of the early-1800s half-robe and petticoat combination featured in our most recent photo shoot, here: Summer Sun.  The strapped, linen petticoat, made entirely from rectangles, also serves as my belated entry to the Historical Sew Monthly April Challenge - Circles, Squares & Rectangles!  

(Photograph courtesy of Maria M.)

The Inspiration

For those who have been reading my blog for a while, you may have noticed that I am quite fascinated by short gowns, and have reproduced several styles [see the tag "short gown"].  Per usual, the inspiration for this project comes from several extant garments and period fashion plates.  My pinterest board, 19th-Century Short Gowns, houses a growing collection of reference images as well as further resources if you're interested.

For this particular project, the fabric found me first!  Way back in February, I was sewing with Judy, the partner-in-crime, at her winter workplace, the Chestnut Bay Quilt Shop.  We took a break to "window shop" in the reproduction room (yes, an entire room!), when this simple print jumped out at us.  Long story short, I forced my friend, as she says, into what would become our "twin" gowns, matching half-robes and petticoats, as well as buying a beautiful red stripe that became her new 1850s dress.  Be warned, friends, fabric shopping with me may be hazardous for your pocket books!  Several of you can already personally attest to this I believe...

Anyways, after securing three yards of the brown print, I drew from two extant examples for the design.  This jacket from the Snowshill collection, with its pleated details and cross over front, spoke to me the most:

Dress Jacket, c.1790-1800
Snowshill Wade Costume Collection, UK
(Image via: National Trust Collections, 1348737.2)

This jacket, though dated later, is quite similar:

Printed Jacket, 1820s
"Jackets would have been worn during the day with
non matching skirts or petticoats for informal occasions"
(Image via: Meg Andrews)

Notice the higher back and pleated skirt details:  

Printed jacket, back, 1820s.
"Marvelous print and some lovely button and frill detail
including two thread work loops above the buttons
where the apron would thread through."
(Image via: Meg Andrews)

I also really liked the longer length of the morning robe on the left:  

Morning Dresses, May 1803
Fashion Plate, M.86.266.52
(Image via:  LACMA)

My version of a Regency half-robe.


The Half-Robe

Moving right along into the construction of the half-robe, to create the bodice, I began with the lining and cross-over bodice pieces from the Elegant Lady's Closet by Sense & Sensibility Patterns.  As patterned, the front is cut in four pieces: two of the printed cotton fashion fabric, and two of the plain, cotton muslin lining.

The cross-over bodice features three deep pleats on each side,
which were stitched to a waistband.

For visual interest, I added a pleated flounce along the neckline edges.  In the detail shot below, you can see how this was attached.  First, bias strips were folded in half and machine zig-zagged to save time.  Next, they were pleated and stitched to the neckline edge.  To keep the machine stitching from showing, I pressed the seam inside and hand whip stitched it to the inner edge or linings.  

The front of the cross-over is secured with two metal hooks and thread eyes.

Later, I added twill tape ties on the inside.

Note on the pattern & fit:  In the mock-up phase, the Elegant Lady's Closet cross-over bodice worked really well with a few adjustments on my friend, however, not so much on me.  The only adjustment I made to front was to trim two inches off the neckline edge, otherwise I kept the front lining and cross-over pieces the same.  If I were to do it again, I would have scrapped both, and drafted my own.  The fronts simply have too much fabric for my frame.  I should have shortened the width of both the fashion fabric and the lining, smoothing out the front and perhaps even eliminating the need for the pleats.  Though I did end up ditching the back pieces for my own, scooping the back of the neckline and raising the center back at the waistline for that gentle upward curve. 


For the bodice lining, I hemmed the top, side and bottom edges by hand, even though they don't show.  As a whole, I machine stitched more interior seams than usual, but made sure that any visible stitching was done by hand.  

The lining fronts are pinned closed when wearing.

I also lined the waistband to hide all of the raw edges with a strip of muslin.
Pressing both edges, I blind-stitched the lining in place.
Neat interiors make me happy!

The front lining when worn.

The back is cut in three pieces, with the fashion fabric and lining treated as one, unlike the front.  The skirt consists of three panels - two in the front, and one pleated in the back.  

Notice the gentle upwards curve at the center back.
I also balanced the skirt to have a slightly lower slope in the back than the front.


The shoulder seams also feature pleats to help control the fullness at the front, and provide a pretty detail.

Shoulder detail - notice the directional pleated trim and gathered sleeves.
Next time, I would add piping to the shoulder seam and armscye.

The lining is attached the the side, shoulder and armscye seams,
leaving the lining free at the front.

I added the same pleated flounces to the sleeve edges.  The only difference is that these were cut on the grain, rather than the bias, to follow the directional print.  

Wrist details, exterior and interior.

Last, but not least, to finish the skirt, I flat-felled the skirt seams by hand and added a small, contrasting calico hem for a pop of color!   

Hem facing, side hems and flat-felling by hand.


The Strapped Petticoat

Now with a new half-robe completed, surely I needed a new petticoat to wear it with!  Enter this lovely fashion plate:

Fashion plate by Georges Jacques Gatine
(Image via: Pinterest)

And this extant example of a strapped petticoat:

Petticoat or linen warp and wool weft, ca. 1825-35
(Image via: Nordiska Museum, NM.0001376)

I am very fortunate to have a friend who works at a quilt shop!  She procured several yards of a perfectly matching, light-weight caramel linen for our petticoats.

My version!

Constructing this petticoat was a breeze!  After taking a few measurements (underbust, underbust to floor, front, back, side, etc.), I ripped three narrow panels of the linen for a total circumference of about 85".  Seamed them together, turning under the allowances at the center back for the opening.  Pleated them to a waistband and added twill tape ties for straps.  

Petticoat features a flat front and knife pleats
with the fullness concentrated towards the back.

The petticoat closes with two metal hooks and thread eyes, and is finished with a printed cotton hem facing.  

Hem facing detail.

The finished strapped petticoat: 

Petticoat front.

Petticoat back.


Historical Sew Monthly Entry Details


The Challenge:  April: Circles, Squares & Rectangles – Many historical garments, and the costumes of many people around the world, use basic geometric shapes as their basis. In this challenge make a garment made entirely of squares, rectangles and circles.


My strapped petticoat meets this challenge as it was constructed entirely out of rectangles.  From the two skirt pieces, to the three hem facings, waistband, and even twill tape straps, every piece is a rectangle! 

Materials:  Lightweight caramel linen, printed cotton for the hem

Pattern:  None, I just measured and ripped right along the grain

Year:  Early-1800s

Notions:  1" twill tape for straps, thread, two metal hooks with thread eyes

How historically accurate is it?  The overall look achieved by the petticoat would be recognizable, however, the particulars of my construction may not be as historically accurate.  For instance, on a linen petticoat, they probably would have turned the hem rather than adding a facing.  Also, they would not have attached the straps by machine.  I cut a corner there, but did hand stitch and overcast everything else!  Maybe 75%?

Hours to complete:  Worked on and off over three days.

First worn:  Way back in April for pictures at the Stone-Tolan House.

Total cost:  Estimated $15


Now, off to blog about the next project...thanks for reading! 

May 31, 2017

Summer Sun - 1800s Half-Robe Photoshoot

"Great is the sun, and wide he goes 
Through empty heaven with repose; 
And in the blue and glowing days 
More thick than rain he showers his rays."
- "Summer Sun" by Robert Louis Stevenson


A whole month without a blog post?  Oh no, let's fix that tonight with a photo shoot!  Way back in April, Maria and I collaborated to document my recently completed half-robe and caramel petticoat - Starbucks frappuccinos for photos, each of us believing that we got the better end of the deal ;)  

Worn over a proper shift, corset, strapped petticoat and stockings, the half-robe, featuring a crossover front and pleated details, and linen petticoat made for fashionable, yet comfortable combination.  In fact, I greatly enjoyed the range of motion provided (i.e. being able to raise my arms above my head as anyone who wears mid-19th century clothing with those dropped armscyes will understand!)  To finish the look, I accessorized with my dotted chemisette, cap (see the post Pretty in Pink) and long, paisley shawl.


The Stone-Tolan House

There's a little story behind our location this time.  In trying to find a suitable, early-1800s backdrop for pictures, we immediately thought of the Stone-Tolan House, which is just up the road from us on East Ave.  Nestled between state highways and the surrounding 21st century neighborhood, the Stone-Tolan House offers a brief respite from modern times and a glimpse into the past private lives and public business dealings of the Stone family.  Still standing in it's original location, the frontier home and tavern has been restored to look as it might have between 1790 and 1820 - the perfect period for our photo shoot.

(Photograph via: Landmark Society of Western NY)
"The Stone-Tolan House Historic Site is the oldest building in [Monroe] county. For over 200 years, it’s been many things to many people. To Orringh and Elizabeth Stone it was home and work; a farm and tavern. To neighbors, it was a place to gather for a drink in the tavern room, and plan the government for their new town of Brighton. To the traveler, it was shelter from the wilderness of early 19th century New York." - Excerpt from the Stone-Tolan Historic Site webpage, published by the Landmark Society of Western New York

To obtain permission to photograph, we contacted the Landmark Society and ended up speaking with Cindy Boyer, the director of public programs.  In fact, I had just met her a few nights previously at the Genesee Country Village.  It was a small world moment!  Ms. Boyer made the arrangements, and we ended up photographing that very weekend in the three main exhibit rooms - the parlor-bedroom, tavern room and c.1792 kitchen.  Many, many thanks to Cindy Boyer and Judy Trabert, the lovely and very knowledgeable docent we met at the Stone-Tolan House!  For more information and to plan your trip to this local treasure, please see the Landmark Society Website!  


Completed Project Shots

First and foremost, thank you to Maria, my sister and photographer, for all of her time and talents!  Without her, none of these photo shoots would be possible, and for that, among many other reasons, I am grateful to have her in my life.  Here's to you, sis!
*All photographs courtesy of Maria M.*


Though closer still the blinds we pull
To keep the shady parlour cool,
Yet he will find a chink or two
To slip his golden fingers through.


The dusty attic spider-clad
He, through the keyhole, maketh glad;
And through the broken edge of tiles
Into the laddered hay-loft smiles.


Meantime his golden face around
He bares to all the garden ground,
And sheds a warm and glittering look
Among the ivy's inmost nook.


Above the hills, along the blue,
Round the bright air with footing true,
To please the child, to paint the rose,
The gardener of the World, he goes.


(Oops, next time we are pinning that cap
as it was quite askew in several of the pictures!)


Poem is "Summer Sun" by Robert Louis Stevenson.  More on the construction of the half-robe and petticoat project to follow...but first, two bonus shots with my TWIN that just happen to show off those golden linen petticoats too!  

(Photograph courtesy of Lydia J.)

Twinning it up with my partner-in-crime!

April 16, 2017

Wearable Art: Strange Water Stays (Part 2)

When we last left off in Part I, I had about 16 hours into the wearable art project with binding and hardware still left to install.  For the class presentation, I brought along both the recycled material stays and my mid-century corset to compare and familiarize my classmates, hopefully changing their perceptions of the "torture devices."  Based on the positive responses from critiques, I think it's safe to say that the combination of water pollution concerns and early 19th century undergarments made quite a splash!  

Strange Water Stays, completed!

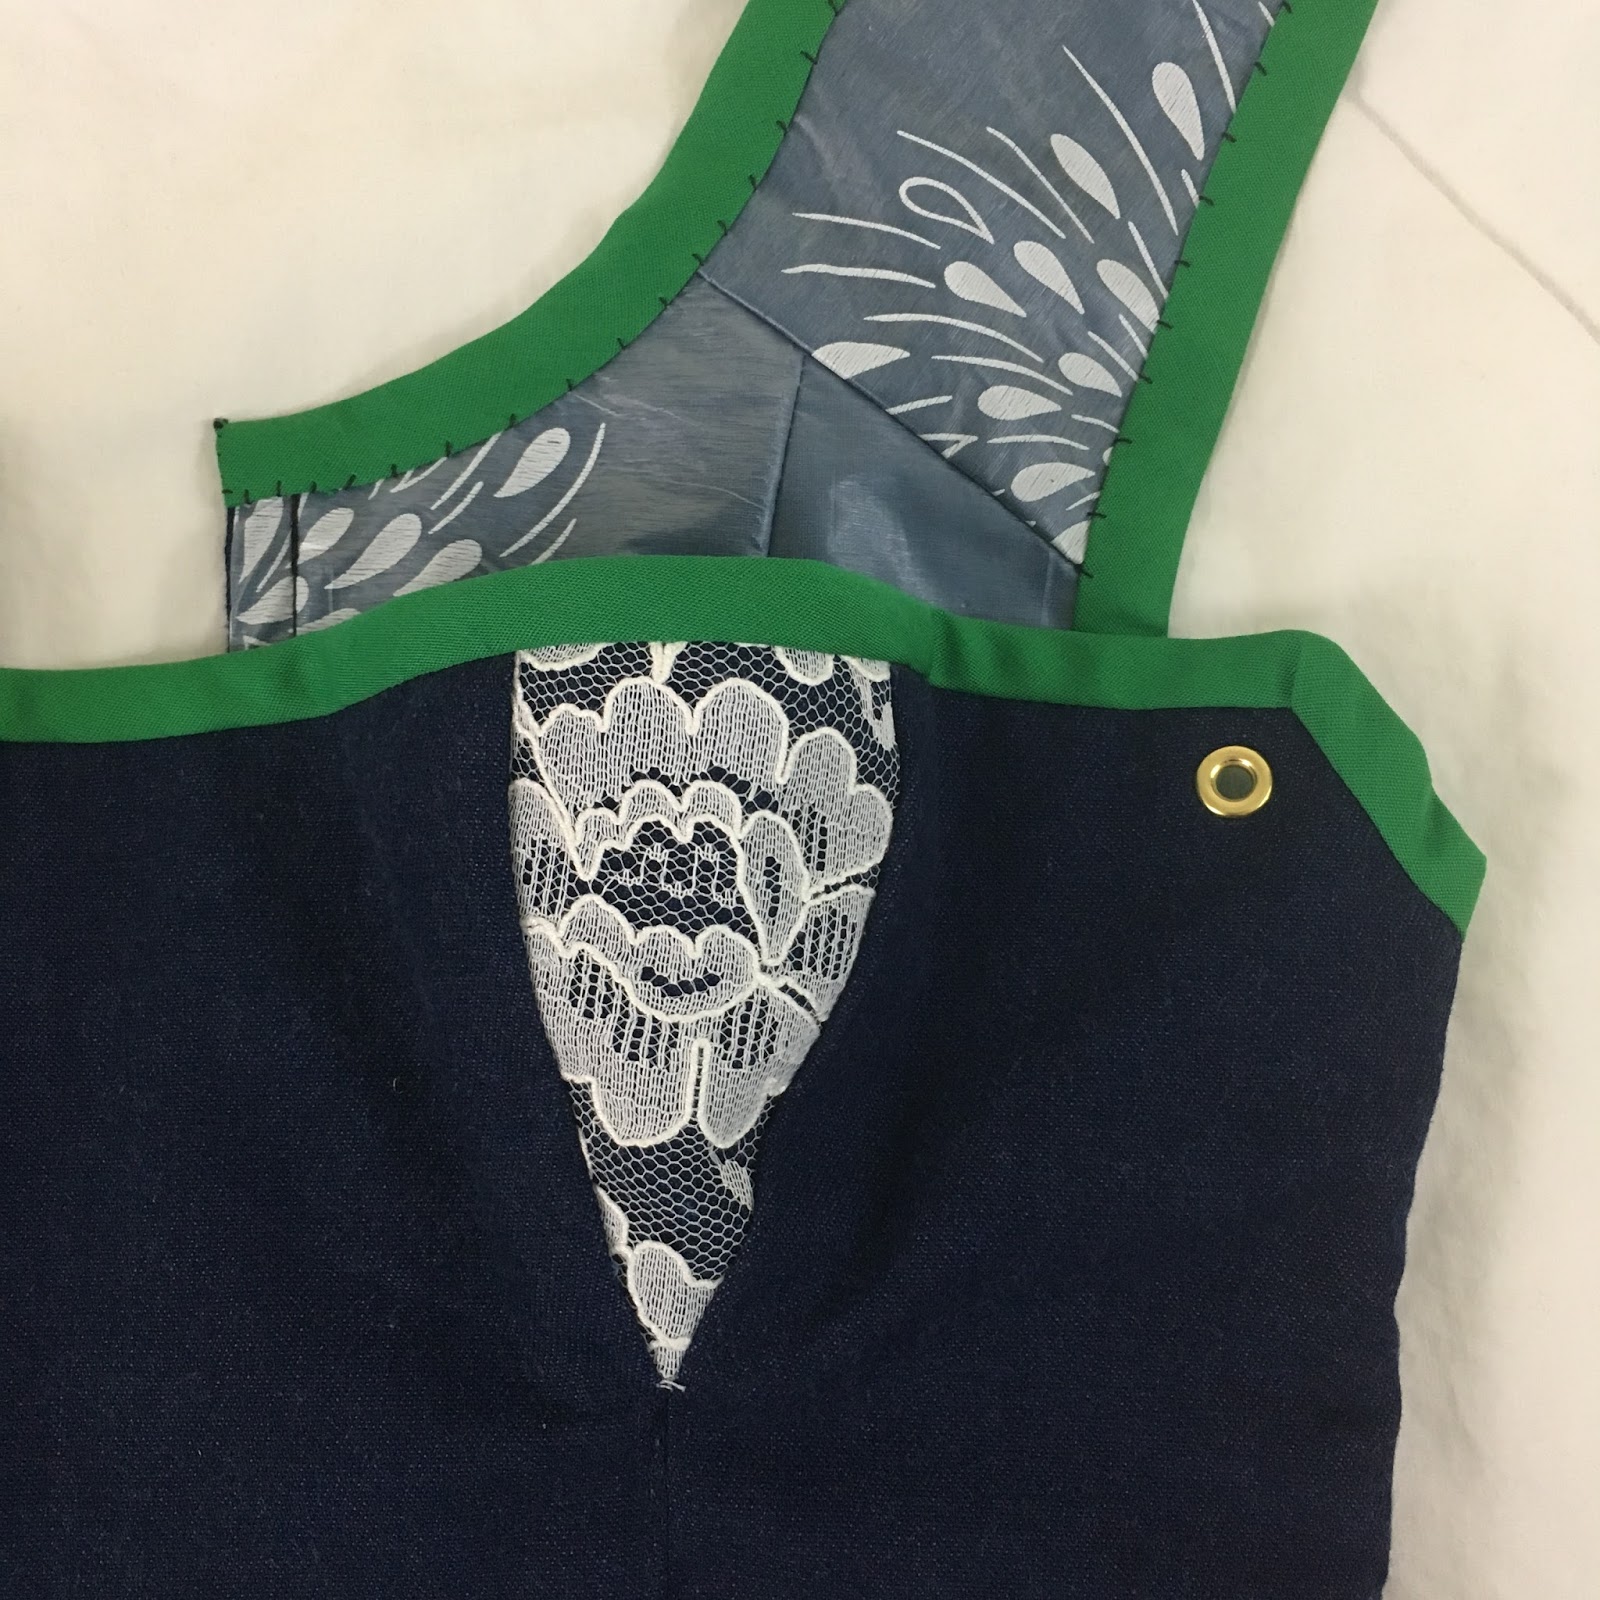
Design Concept:  From recyclable materials to wearable art, the Strange Water Stays are a visual, environmental statement.  Much as stays served as the foundation for the early 19th century silhouette, water supports our very existence and its vast bodies sculpt the landscapes of the Earth.  The dark blue denim, lace and vibrant green binding of exterior of the stays represent the beauty that is, much like our lakes and waterfront views offer.  However, the interior speaks to an unnoticed, sinister truth of death and decay lurking beneath the water's surface.  Intention and unintentional litter, like the paper, plastic and shiny metal products representing unnatural pollutants interspersed among the lily pads of the corset, silently chokes plant and marine life to death.  If we do not strive to make greater efforts to protect our irreplaceable aquatic ecosystems, polluted, lifeless, strange waters, will be the only reminder of the natural beauty that once was left.  


Completed Stays:  This project, transforming trash and recyclable materials into art, challenged me not only as a designer and artist, but technically as I had to adjust to issues that arose with the use of non-traditional materials.  (I only stitched all the way through one finger and broke one sewing machine needle in the process!)  After binding the top and bottom edges of the stays, I installed the grommets for the straps and used a pair of old shoe laces for lacing.  In the spirit of conserving resources, I decided to only place bones (aka plastic zip ties) at the center backs and save the rest of the grommets for future projects...

Outside - Shell of denim re-purposed from a skirt, lace curtain overlays and green cotton binding.  

All laid out, exterior.

Bust gusset and lace overlay detail, exterior.

Center back, exterior.

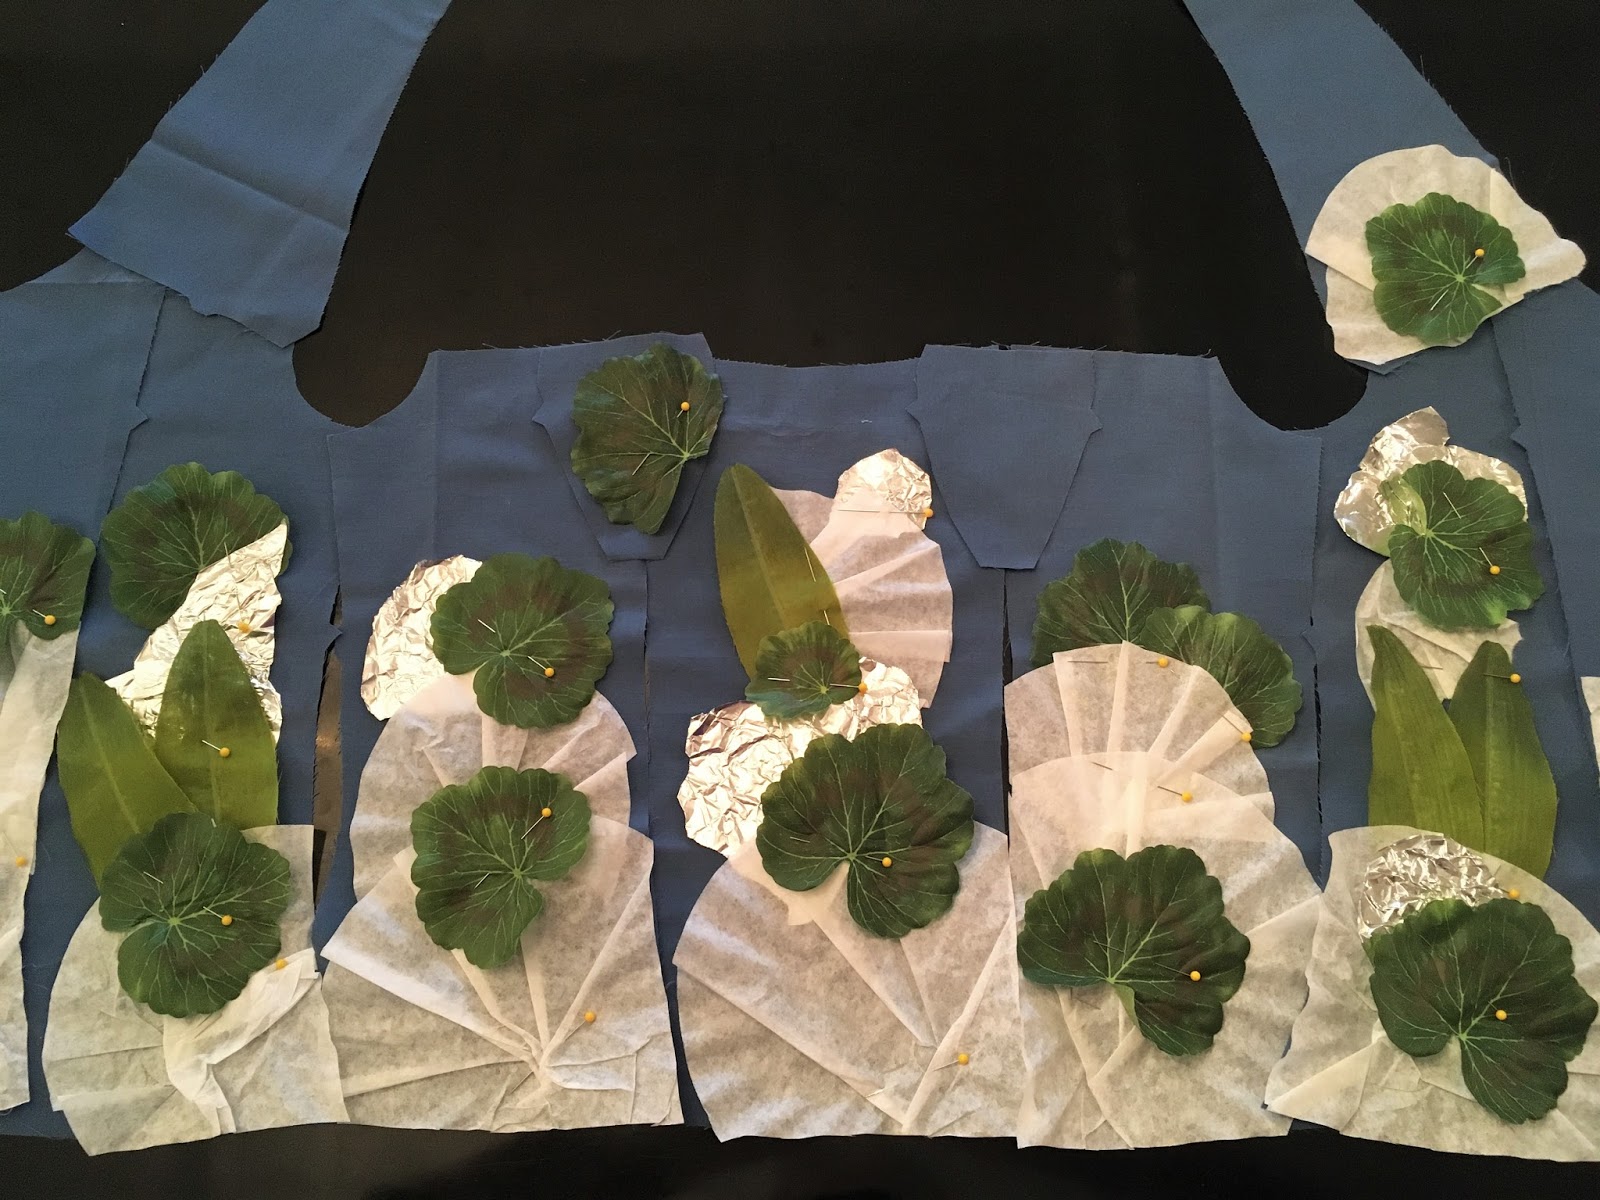
Inside - Blue cotton interlining, plastic shower curtain liner re-purposed for lining, plastic zip ties for boning, metal grommets and shoe strings for lacing.  The "pollution" included aluminum foil and paper coffee filters, and the "lily pads" were leaves left over from a plastic flower bunch. 

All laid out, interior.

Center front, interior.

Comparison -
Side view, exterior.

Side view, interior.


Strap and grommet detail, interior

Bust gusset and grommet detail, exterior.

Bust gusset detail, interior.


Strap detail, interior.

Strap detail, exterior.

While I do not foresee myself actually wearing these stays, remade in the appropriate historical materials and natural fibers, they might provide decent support for early 1800s and 1830s endeavors.  All in all, the construction time totaled about 20 hours.  

April 12, 2017

Wearable Art: Strange Waters Stays (Part I)

This semester, I decided to try something new and enrolled in a studio art class that explores the traditional and contemporary uses of the sketchbook.  The class emphasizes both the keeping of a sketchbook itself, as an essential tool in the development, practice and documentation of the creative process, and the exploration of a variety of materials and techniques.  Through a weekly series of 5-6 completed pieces of self-directed work and assigned projects, the demands are both challenging and rewarding from ideation to creation and critique.  

(Photograph via: Pinterest)

The last challenge presented to the class was transforming trash and recyclable materials into art.  We were given two weeks, and few restrictions beyond using re-purposed materials and that nothing new could be purchased.  That same class, we were instructed to brainstorm usable materials and project ideas. 

Immediately, I knew that I wanted to create a piece of wearable art.  And not just any garment, but one that made a statement.  Combining both water pollution concerns and early 19th century undergarments, the "strange waters stays" project was born! 

The initial brainstorming.

Phase two included the actual designing of the stays.  We were instructed to prepare several detailed drawings of our objects from various views and collect swatches of the intended materials to pitch to the class.


For my nontraditional, recycled corset materials, I chose to re-purpose denim from a donated skirt and lace from donated curtains for the outer layer.  I also chose to use bright green bias tape, an accidental purchase wasting away in the stash, for binding.  

Front view.  Notice that the seams and boning channels are marked.

For the inside, I selected an ocean blue cotton from the stash for the interlining, and my previous shower curtain liner, which needed to be replaced anyways, for the lining.  The "pollution" included tin foil and coffee filters, and the "lily pads" were leaves left over from a plastic flower bunch.

Interior view showing the intended construction.

More views of the stays.  Each sketch was worked in pencil, ink and watercolor.  I intended to use metal grommets and shoe strings for lacing, plastic zip ties for boning, and either a paint stick or cardboard to serve as the front busk.  


I thought that the lace overlays would add some visual interest to the outside, but also would serve as a metaphor for our lakes and waterways - scenic beauty at first glace with the sinister truth of death and decay lurking beneath the water's surface.  

Side view showing lace overlays, boning placement and stitching lines.

Back view, also showing seam and boning placement.


After our designs were presented and approved in the following class, we were given one week to assemble our projects.  Enter phase three: the construction process!  Because this was such a new experience, I did my best to document each step.  

First, I cut out each layer - lace overlays, denim outer, cotton interlining and shower curtain lining.  (Yes, I wiped down the shower curtain liner before use...)


Lots of layers!

Then, I assembled the outer denim shell, flat-lining the lace overlays to the bust gussets and side back pieces.  This was a new technique for me.


Constructing the inter lining was next.  This is where I had to get creative and adjust to the challenges of working with the non-traditional materials as they arose.  

I played around with the placement of the "pollution" until satisfied.  The coffee filters were crumpled and pleated to resemble lily pads, while wadded pieces of aluminum foil were interspersed among the "lily pads" or plastic leaves.  This represents how human litter, intentional or unintentional, silently chokes plant and marine life, forever altering those ecosystems.  Once everything is dead, such strange waters are the only thing left.  

Artistically arranging the polluted waters with paper
coffee filters, pleated to resemble lily pads, plastic leaves and shiny foil,
three types of litter that end up in our waters.   


Originally, I planned on hand tacking everything, but decided to save time and zig-zag all of the edges.  Or so I thought...this process seemed to take the longest of the steps as neither machine, nor I was used to sewing with the non-traditional materials.  Only one broken needle!  

Zig-zagged in place.

Afterwards, I flat-lined the plastic shower curtain lining to each piece, sealing the "pollution" in place and adding a murkiness to the "waters."


Assembling the lining was tricky because of the bulk in each seam.  I did my best to press the seams flat using the lowest setting on the iron and a cotton cloth to prevent any melting...


Aligning the outer and lining layers, wrong sides to the inside, I stitched along the upper edges and stitched-in-the-ditch to join several seams.  I found it very difficult to stitch through all of the rather stiff layers, so decided to skip the boning except at the back edges.  Now at the 16 hour mark, with the binding just pinned, I had completed all that I could before class...Stay tuned for the final results in part II!

We ❤︎ Our Patrons

Like what you see here, and want to support future blogging and educational programming? Consider becoming a Patron - click on the button below to unlock exclusive content, bonus blog posts, and more! Every contribution makes a big difference, thank you!