Showing posts with label Cap. Show all posts

March 11, 2023

A Beribboned Cap & Tasseled Slippers

Following on the heels (sorry, couldn't resist the shoe pun!) of my last blog post on the Making on an 1820s Morning Dress, I wanted to spotlight the two accessories that really made the ensemble complete: the beribboned cap and slippers with bow clips and hand-dyed tassels!  

More is more with ruffles, ribbons, and bows! 

Beribboned cap

If you've been following me for a while, you know I'm all about those big, ruffly, and beribboned caps of the Regency through Romantic eras!  I don't think I'll ever tire of making or wearing them...they're just so ridiculous and period.  Anyways, this post is to show what a little wired ribbon can do to instantly transform a cap! 

While mine was not intended to be a replica - this portrait of Mrs. Miller captures the look I was going for oh so well: down to the double ruffles and pink ribbons!

Portrait of Mrs. Miller of Newton, New Jersey, by John S. Blunt
Image source: Pinterest 

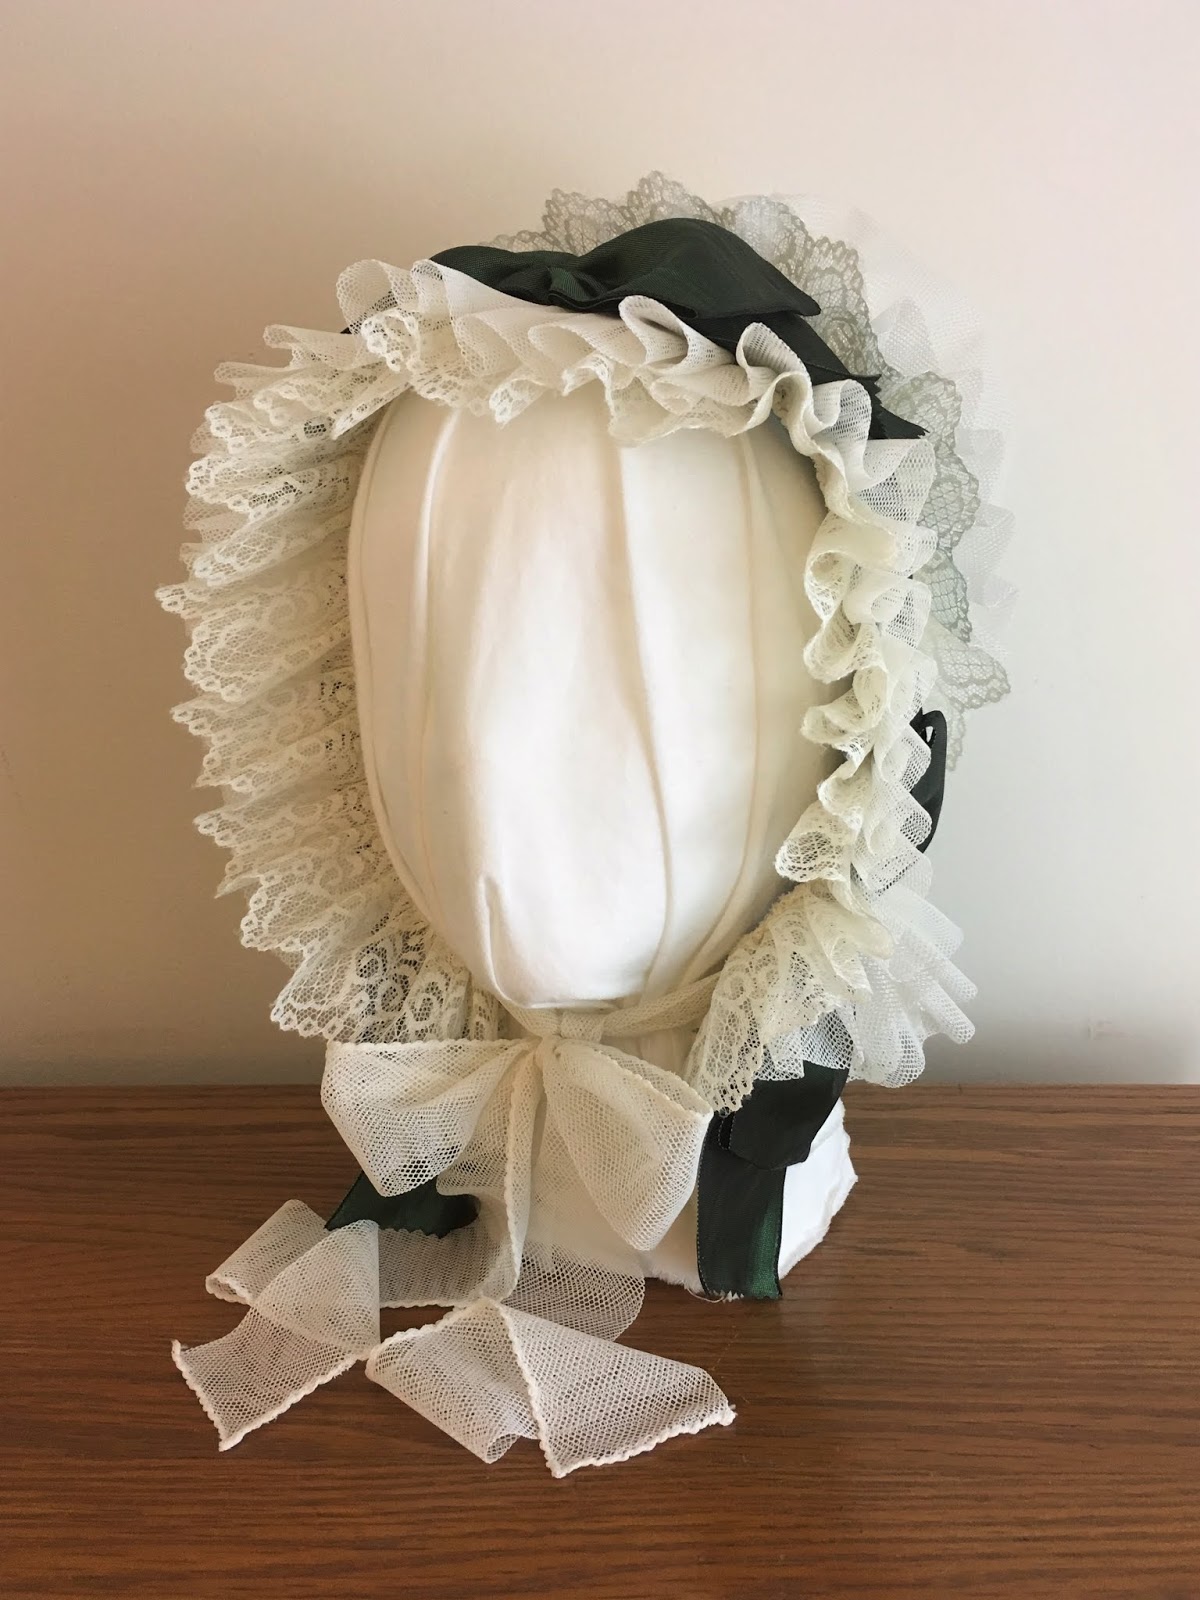
And here's my version of an 1820s beribboned cap, featuring double ruffles and wired ribbon loops: 

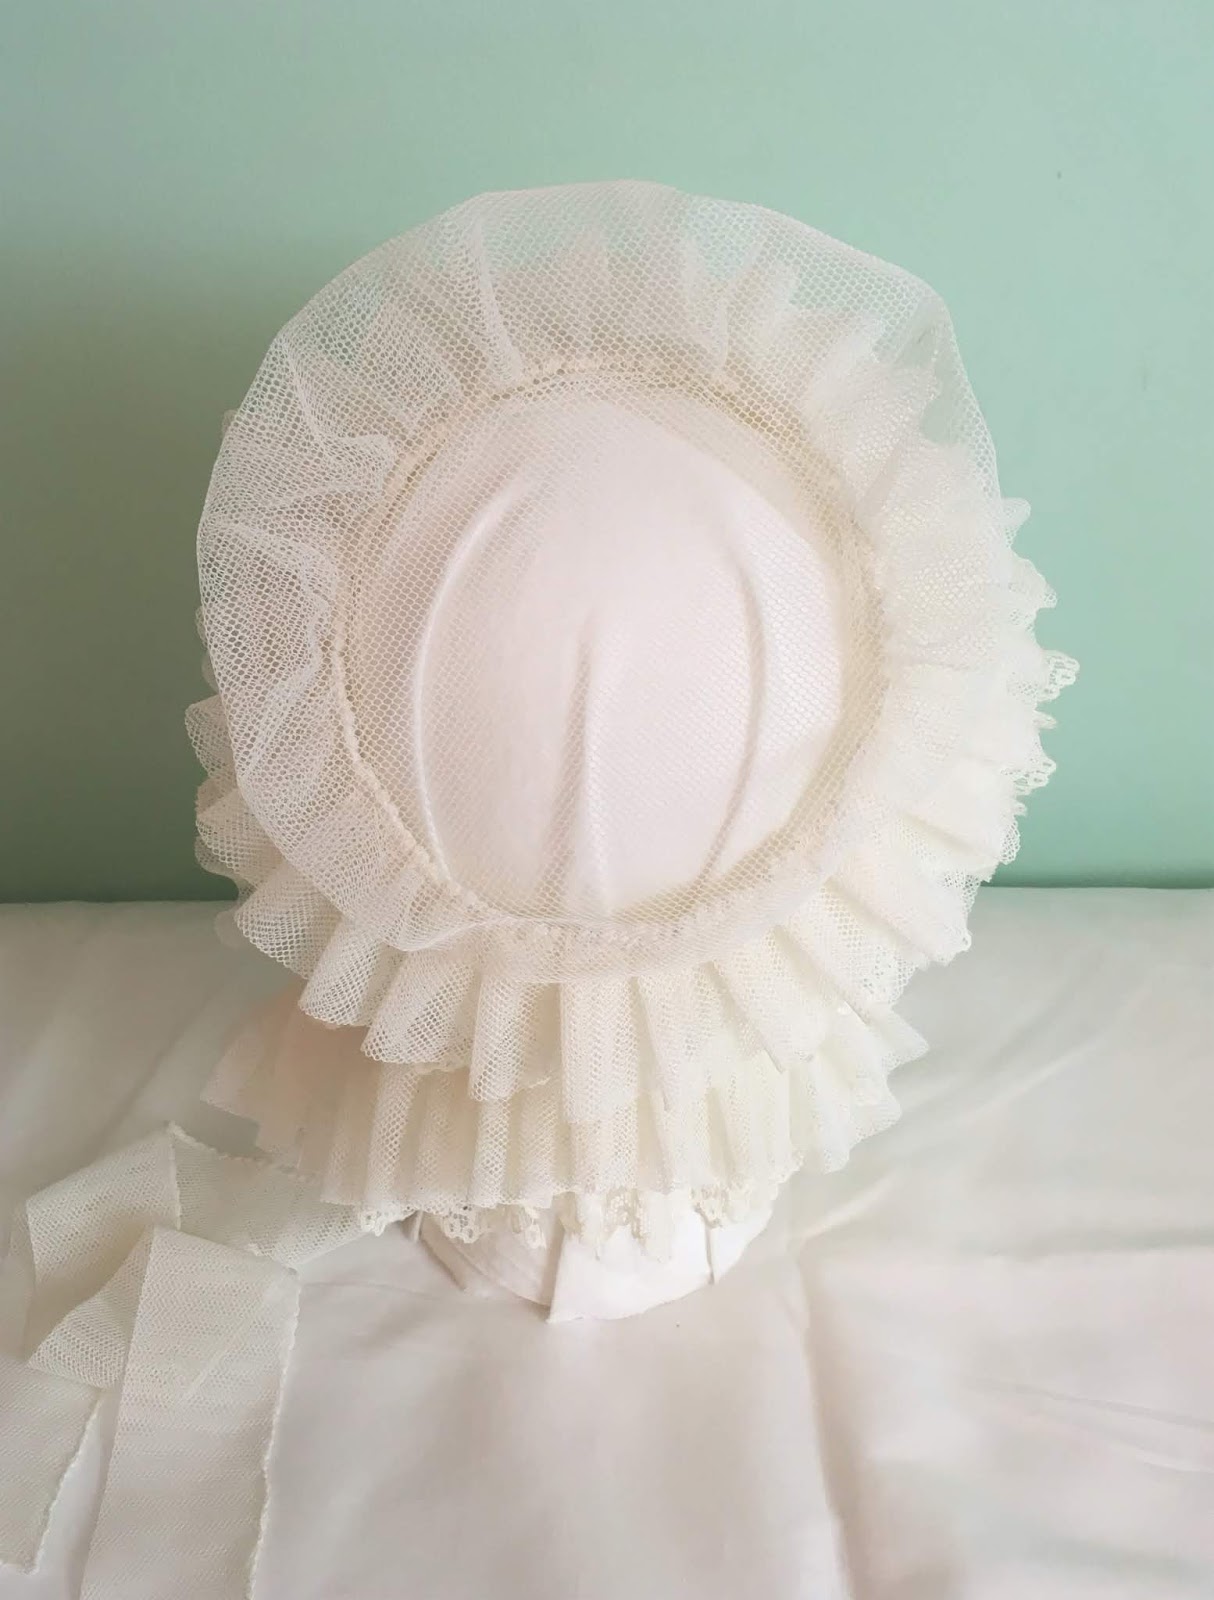
An 1820s beribboned cap decorated with wired ribbon loops.
Interior cotton twill tape "utility" ties,
and decorative ties of the same ombré ribbon with wires removed.

I really let the ribbon guide me as I decorated the cap.  First, I made a large double-loop bow with tails, which was tacked at the top center.  I used a long continuous length of ribbon for the side bows, and tacked them along the entire band of the cap.  After removing the wire, I also added ribbon streamers, which can be tied under the chin, or left loose like in the portrait above. 


In this side view, you can really see the double layer of ruffles -
the entire cap is handstitched with narrow rolled hems and whipped rolled gathers. 


Tasseled Slippers

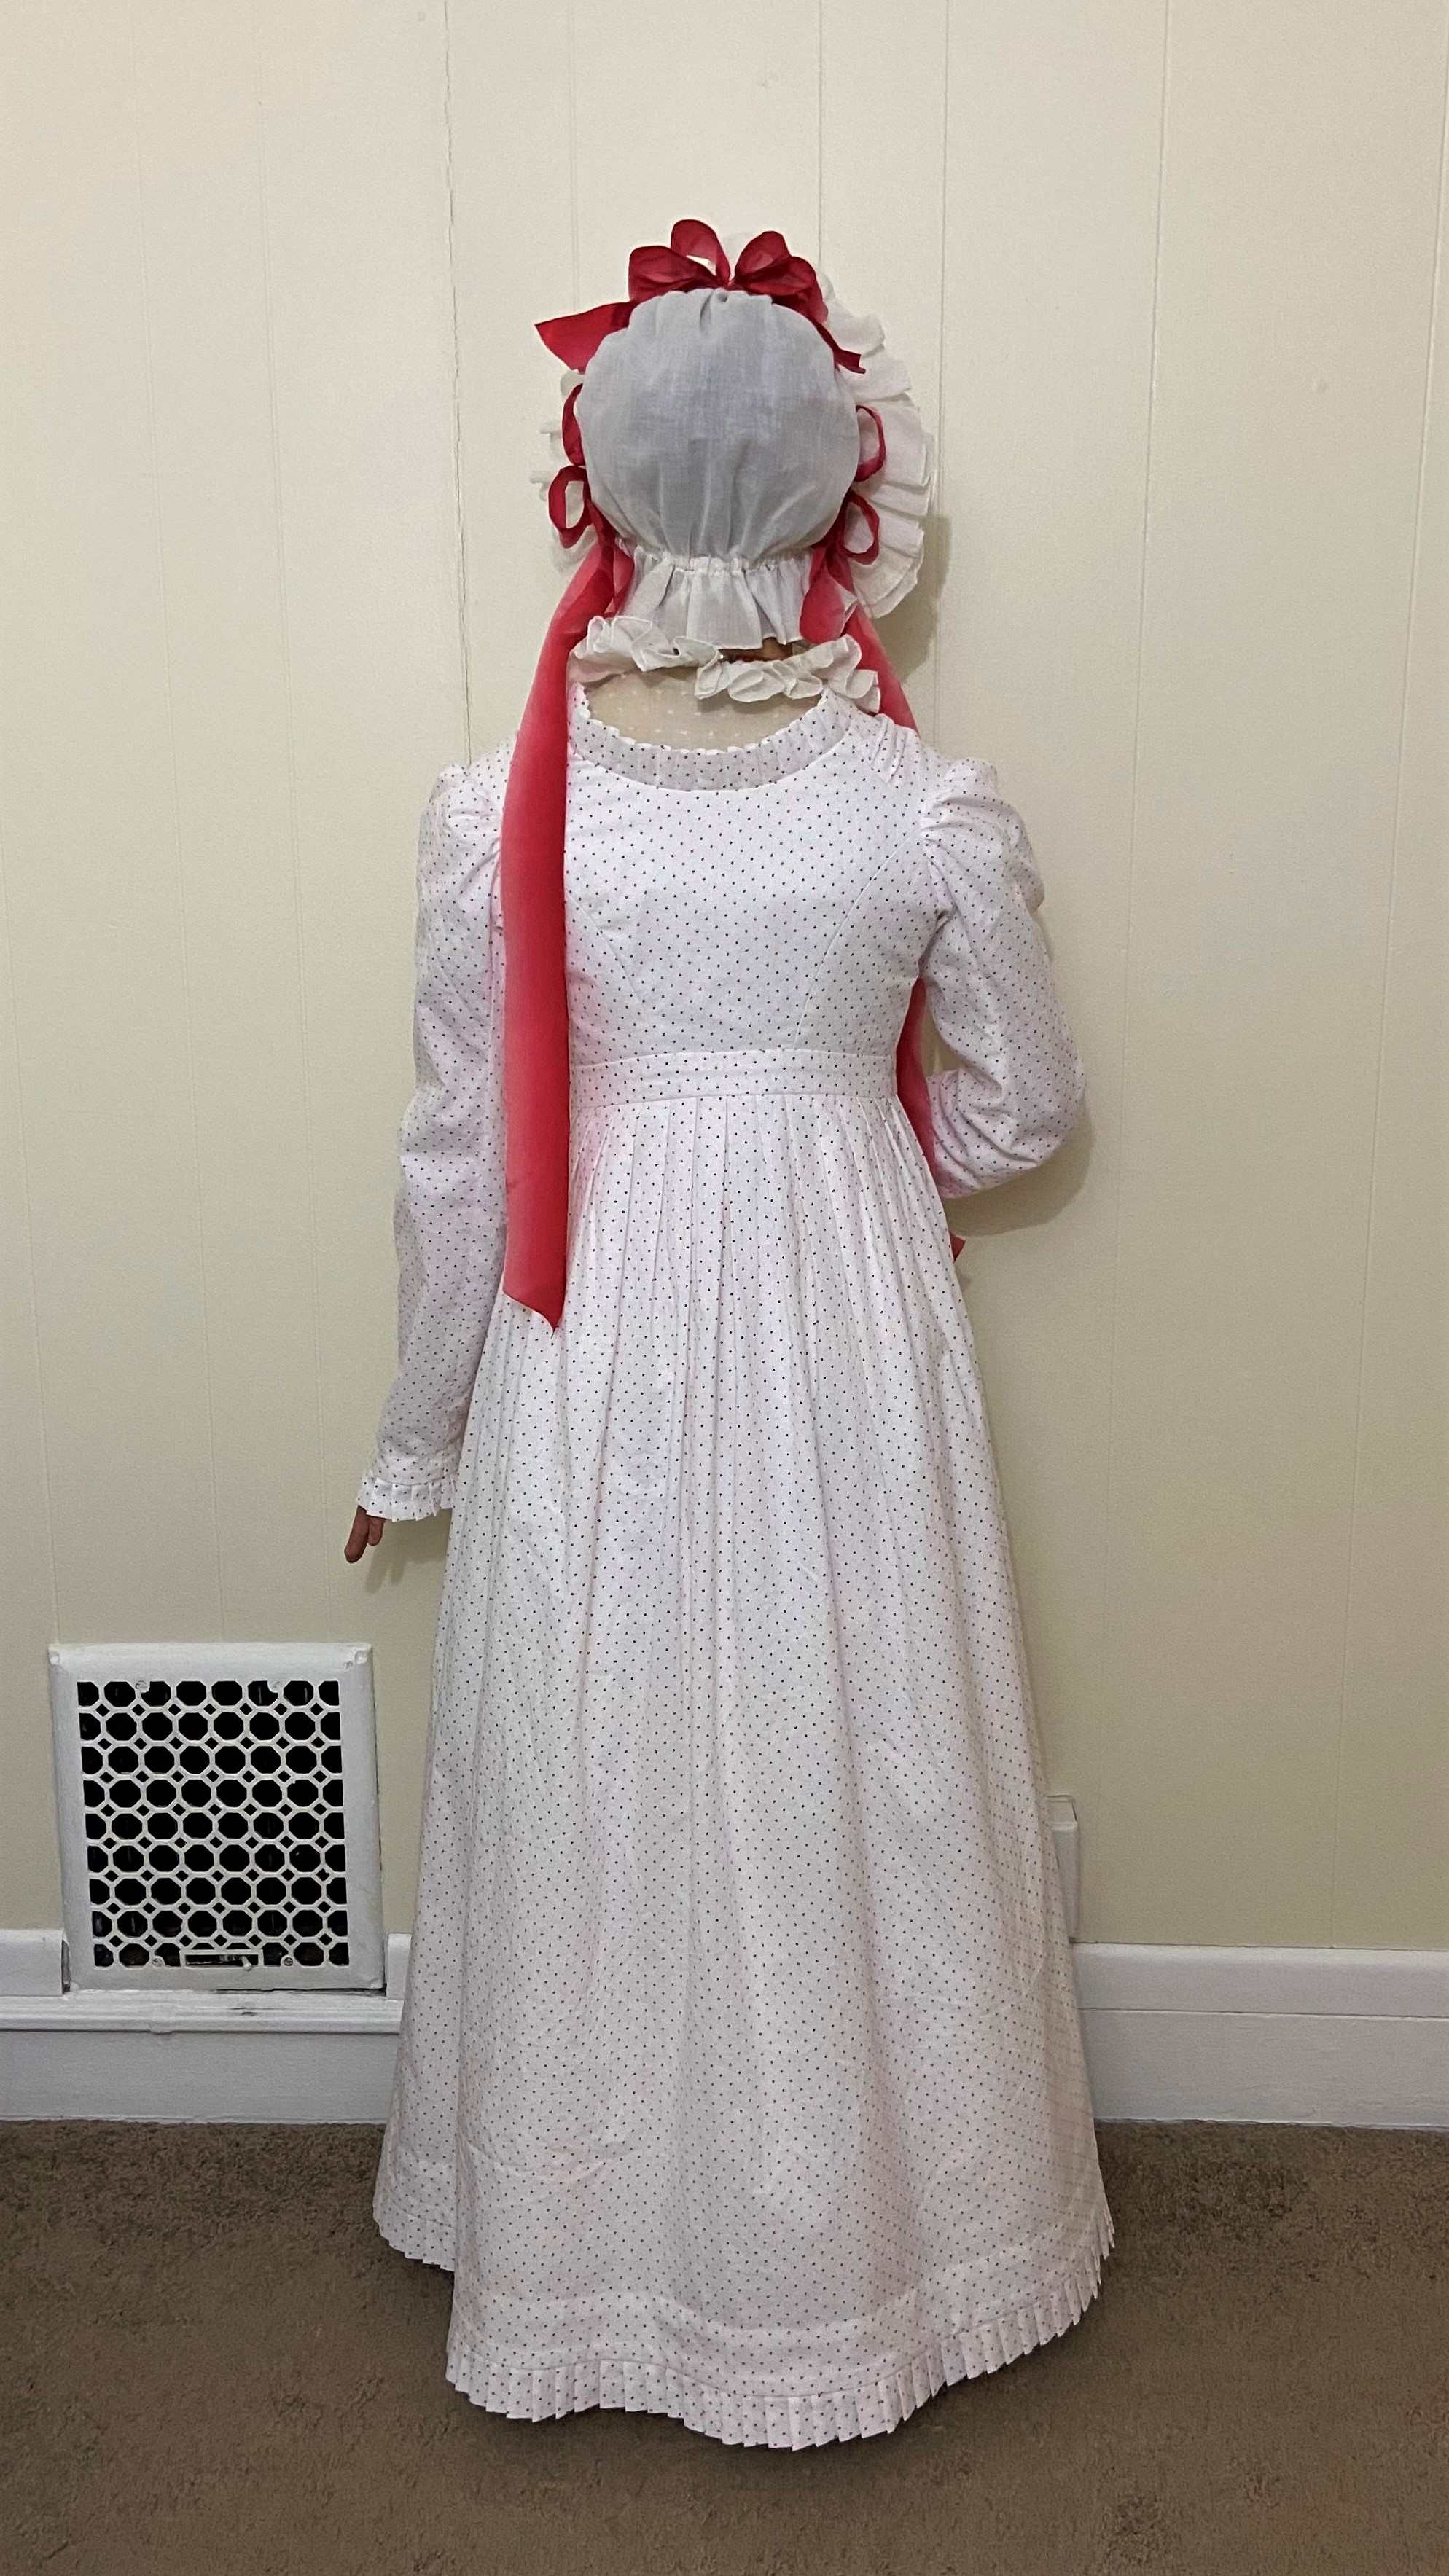
If you're also not able or wanting to spend a small fortune on period footwear (and don't mind a modern cheat or two), try making shoe clips!  I transformed a pair of cheap red flats that had a similar, narrow rounded toe with a squared foot opening to Regency era examples, with clip-on bows and handmade tassels.  Perhaps they read more costume, but they make me happy! 

I used this very pretty embroidered pair of women's shoes from RISD museum for scale:  I wanted to line the edges of my slippers, and mimic the side seams with pink petersham ribbon to help with the illusion, but I didn't have anything similar on hand at the time.  And, this was just for pictures anyways. 

Women's shoes, c.1810.
RISD museum, (object number: 37.335)

To make my shoe clips, I used the same ombré ribbon with the wire removed for the bows.  Then, after observing other extant examples with all kinds of fringe and tassels - I set to making my own tassels from leftover cotton yarns that I've dyed in shades of red and pink.  Once I was happy with the bows, I added metal shoe clips to the back: 

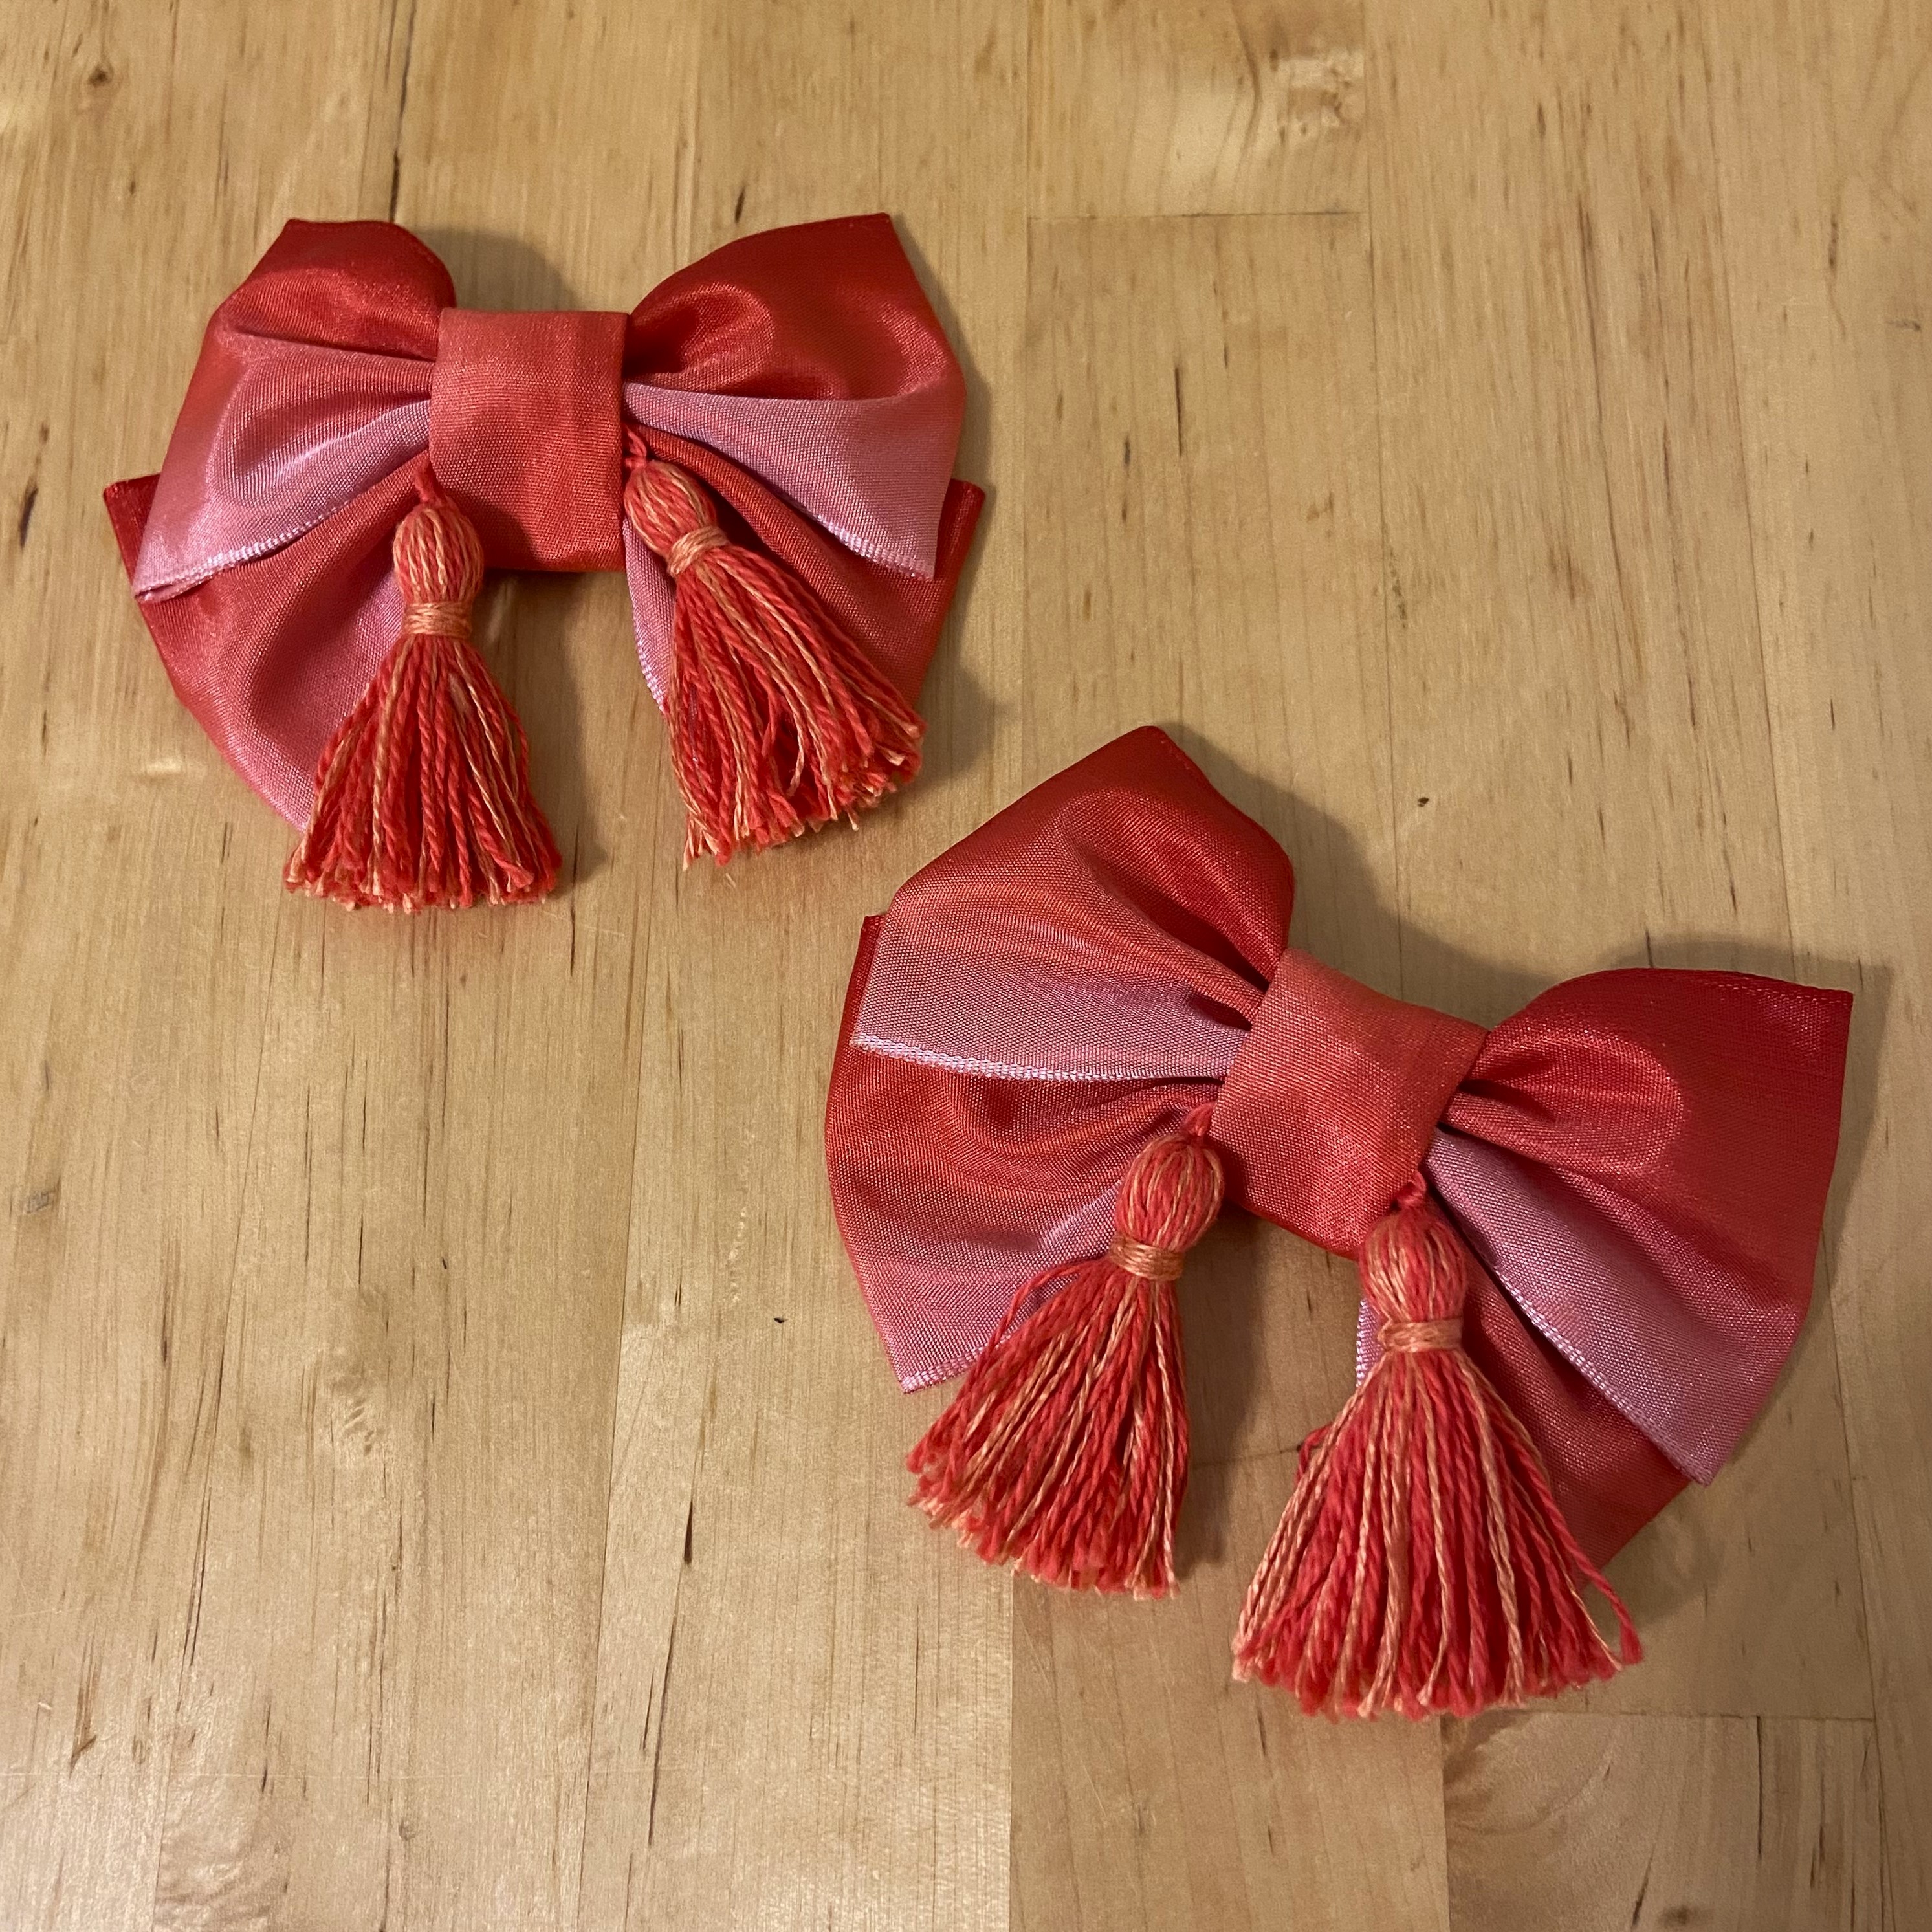
Here's what the removable shoe clips look like on their own:
Ombré ribbon bows with hand-dyed tassels with metal backings.
By making them removable, I can mix-and-match with other shoes.

Here's what the shoe clips look like when installed: and from the comfort of my own parlor, they're passable for Regency slippers to me!


And that's a wrap for this Regency wrapper (terrible pun, I know) and the series - I can't wait to actually wear the morning dress for an event!  I still have a long ways to go on my 1820s wardrobe before August, as I still need to make a day dress, outerwear, bonnet, and maybe a linen shift and new set of long stays if there's time. 

Lounging around like it's the 1820s!

Like what you see here and want to support the creation of future content and fashion history programming?  Consider joining us over on Patreon with pledges starting at $2/month, and you'll also unlock exclusive content like bonus blog posts and more!  Follow @youngsewphisticate on Facebook & Instagram for regular updates.

Thank you for reading & special thanks to our generous patrons!

March 6, 2023

Making an 1820s Morning Dress

I made a morning - not to be confused with "mourning" - dress or wrapper, which is a garment intended to be worn in the privacy of ones home, or before getting more properly dressed into an afternoon or "walking" dress.  With now two "Getting Dressed in the 1820s" presentations coming up - in both August and October 2023 - I wanted something to throw on for modesty and comfort, before dressing in front of a live audience.  This blog post details the inspiration behind, construction of, and then styling of an early-1820s morning dress: 


Historical Inspiration

Before diving into a new project, I like to pull together a Pinterest board of inspiration images - these include extant examples from online museum collections, fashion plates, historical portraiture, and any period pattern diagrams.  Ever since I saw this polka-dotted printed dress, c.1810-1815, in the DAR's "An Agreeable Tyrant" exhibit, I've been wanting something similar.  And I'm not the only one in love with it - as some of my Instagram followers let me know - there's actually a Fig Leaf Pattern for this exact dress, available for purchase through Burnley & Trowbridge

While my morning dress is not a replica, I did take inspiration from the cross-over or surplice bodice, and the ruffles along the neckline, sleeves, and skirt hem.  Of course, I also used a small, red polka-dotted print!  I ended up purchasing a bolt of 100% cotton quilting fabric from JoAnn's online with a coupon, which worked for my purposes. 

Polka-dot printed dress, c.1810 - 1815.
From a private collection, displayed as part of the DAR's "An Agreeable Tyrant" exhibit.

Two other examples of morning wrappers specifically influenced my design, including this one from the MET museum:  I liked the small, guessing 1" - 1.5" ruffled trim along the edges, and the skirt opening falls at the side, just about where mine does too.  

Morning Dress, c.1810 - 1820.
MET museum, (accession number: 1978.88.1)

As well as this example of a "wrap over gown" from the Victoria & Albert Museum, which has a similar crossover bodice to mine:

Peignoir, made c.1812-1814.
V&A Museum, (accession number: T.798-1913)


Construction Details 

The pattern for this project was, well, an experiment and mash-up of several other patterns.  For the lining and back pieces, I used my self-drafted bodiced petticoat pattern, and just raised the neckline by 1.5" all around.  I flatlined the back lining and fashion fabric pieces, and then attached them to the front lining, only, at the shoulders and side seams.  The lining flaps close with two metal hooks and thread eyes, first, and then the crossover. 

Front lining provides structure and interior support, and is seamed with the back at the shoulders and sides.  The wearer fastens the lining first, with two metal hooks and thread eyes, before the crossover portion.

The fashion fabric and lining are treated as one at the back.
After stitching, all of the seams were pinked and pressed flat.

For the front crossover portion, I used an altered version of the bodice front from the Elegant Ladies' Closet by Sense & Sensibility patterns.  I had used this before for a shortgown, and had to reshape the neckline, armscye (to fit with my lining pattern), and waist.  Once I had the pieces cut out, I matched them at the shoulders and sides of the bodice, and basted generous pleats along the waistline.  Here's what the crossover portion looked like before trimming and finishing: 

Added a crossover front with a shaped neckline and the fullness pleated at the waist.

Next, I added a waistband, which I realized later I had not accounted for when I was measuring for the skirt (so I had to redo the skirt hem at least once).  Speaking of the skirt, it was just rectangles, balanced (so that the back was slightly longer than the front), pleated, and seamed at the waist.  I did whipstitch a cotton muslin facing over the waistband to enclose all of the raw edges and to keep the interior tidy. 

Then, I turned my attention to making the trim.  This was easy - just long strips seamed together and knife pleated.  I did this at the machine, just eyeballing the spacing, and made sure to change directions at the center back, so the pleating would be directional.  I had to make enough trim for the entire neckline, front edge, hem, and sleeves.  

Pleating trim for the neckline, front edge, skirt hem, and sleeves.  

Once I attached the trim to the raw edges, I made cotton muslin facings to cover all of the raw edges.  The facings all had to be handstitched, as these stitches would be visible from the outside.  It didn't take too long overall, and I'm happy I enclosed all of the raw edges, in case the front edge flips open and to protect the hem from wear. 

Here's some more in-progress shots of attaching the skirt, pleated trim, and an interior shot before I added the interior waistband and facings: 

Pleated trim on the front.
To enclose all of the raw edges, I added facings from plain cotton muslin, 
which had to be handstitched in place as the stitches would show on the outside. 

Pleated trim on the back.
I used directional knife-pleating for both the skirt and the trim,
switching directions with box pleats at the center back.

A detail shot of the interior, before I added the waistband facing
to enclose the raw edges and neatly finish the interior. 

Apparently, I stopped taking pictures from this point to completion.  But, I did make straight sleeves (another pattern pulled from my stash) with pleating at the wrist; and added interior twill tape ties and more metal hooks and thread eyes to the crossover portion to securely fasten the morning gown.  


Completed Project Pictures

To style my newly-completed morning dress, I trimmed a cap and tasseled slippers (to be featured in their own, separate post) with a vibrant, pink to red ombré ribbon.  I wore the morning dress over clocked stockings, a shift, long corded stays (though wrappers can also be worn without support garments), and my 1820s corded petticoat.  In addition to the cap and slippers, I accessorized with a coral necklace, chemisette, large coral drop earrings, and face-framing curls.  

Per usual, I took a lot of pictures from all the different angles:

1820s morning dress with the petticoat's flounced hem peeking out.


I also took some seated pictures, as this was actually only a few days after a minor foot procedure, and I was having trouble walking on my foot...


The completed 1820s morning ensemble!

Like what you see here and want to support the creation of future content and fashion history programming?  Consider joining us over on Patreon with pledges starting at $2/month, and you'll also unlock exclusive content like bonus blog posts and more!  Follow @youngsewphisticate on Facebook & Instagram for regular updates.

Thank you for reading & special thanks to our generous patrons!

January 14, 2020

Double the Ruffles, Double the Fun

Readers, you know me, when it comes to caps - double the ruffles, double the fun!  This post is all about a quick, little, and utilitarian project, which was trimmed with a large bow of a vintage, blue moire ribbon for the previous photo shoot, here: To Walk Is by a Thought to Go - 1810s Photoshoot

A Regency Era cap with double the ruffles for double the fun!

Usually, I'm all about the ribbons and frills, but for this Regency Era cap, I decided to take a "less-is-more" approach and let the two, little ruffles be the stars.  Though, I do think the big, blue bow added just the right finishing touch. 

Per usual, I chose a fine cotton lawn for the material.  I followed the period construction method of finishing each of the pieces - caul, band and ruffles - separately, then joining them together with whip stitches.  The cap is entirely hand-stitched using narrow, 1/16" rolled hems and whipped rolled gathers.

The cap on its side.

From the inside - constructed in the period methods,
each of the pieces are finished separately,
then joined together with whip stitches.


Completed Project Shots

Front view.

3/4 side view.

Side view.

Other side view.

Detail shot of the ruffles with 1/16" rolled hems.


Bonus: just for fun, here are a few shots of the cap in action!  This was back in June, I think, during one of my first days solo weaving at the Humphrey House.  I was actually working in the Dressmaker Shop for a special fashion program, but they were in need of a weaver, so I was happy to make the switch.

Weaving at the Humphrey House.

One of the summer projects I worked on -
A wool shawl, 2/2 twill weave.

My friend Rhonda, the dressmaker, has an adorable, little, double-ruffle cap that she copied from an original in the Susan Greene Costume Collection.  She calls it her "whip cream cap," and I've admired it for years.  It just perfectly frames her face, and the ruffles look so pretty peaking out from beneath a bonnet.  (And Rhonda has quite the bonnet collection!)  

If I ever get my Regency act together, we'll have to plan an outing (or at least an excuse for pictures).  I haven't seen her in a long time, and I miss her...anyways, I might start calling this my whip cream cap in honor of hers:


May 22, 2018

1830s Cap of Lace, Net & Ribbon

From ginormous gigot sleeves to towering Apollo knots, if there was one thing to be said about the fashions of the 1830s, having "too much" was not a concern.  Pile on the lace, the ribbons, frills and bows!  The more the merrier!  And that's just what I did for this newly completed cap:

1830s cap of net, lace and wide ribbon trim.
Tomorrow I'll be returning for my first day of the 2018 museum season, substituting for another interpreter at the Foster House.  While I enjoy the responsibilities of working in the interpretation office, there's nothing like getting to play "dress up" for a day and sharing stories of the past.  While I would have loved to have a new dress for the occasion, I decided to alter a previous creation instead and finish this confection of a cap.  In fact, this has probably become my most favorite cap to date! 


Historical Inspiration

As always, I like to look to extant examples, portraits and other period appropriate sources for inspiration.  This painting really spoke to me: 

Portrait of Alexandra Nicolai Sicily
by Christian Albrecht Jensen, 1824
(Source: Hermitage Museum, via Wikimedia Commons)

My reproduction cap.

I modeled my design after this cap from the MET:

Morning Cap, 1835
(Source: Metropolitan Museum of Art)

And got the idea to pleat the net from this:

Woman's cap of net and satin ribbon, c.1825
(Source: Los Angeles County Museum of Art)

But it was finding this extant example that really helped my design come together:

Net cap with green and yellow striped silk ribbon, c.1800-1830
(Source: Lot 66 of the Helen Larson Private Collection)

For more extant examples and other inspiration images, feel free to visit my Early 19th Century Caps Pinterest Board.  


Construction Details

If you've been following my blog for a while, you may have noticed that I make a lot of caps.  Rather than repeat more of the same, I'll just say that rolled hems and whipped rolled gathers on net are nothing like fine cottons or linens.  Net is far more finicky, and not for the faint of heart!  

In progress: the cap itself is a single layer of net finished with rolled hems. 
Both the lace and net frill (double layer made by folding a long strip in half)
were pleated, then attached with rolled whipped gathers.

Outer layers of frills attached.

The gathers ended up being a little more bulky than I would prefer due to the pleating and all of the layers.  In a few of the extant examples I've seen, the frills appear to be attached with a running stitch and then covered with a narrow band of net to enclose the raw edges.  I would explore this technique as a better alternative in the future...

Interior view of the cap.

The ties, much like the net frills, were just long strips folded in half and rolled up the sides:

Interior view of the ties and rolled whipped gathers or hems.

Exterior view.
Please note that both sides of the cap are visible.


Untrimmed Cap 

Once the ties were on, I took a break to capture some pictures of the untrimmed, but finished cap.  


So sheer!  No hiding unstyled hair under this cap!


Completed Project Shots 

To complete the look, I trimmed the cap with two yards of a beautiful, wide moire ribbon from The Dressmaker's Shop


I think the ribbons really change the look.  What do you think? 


Thanks for reading!

We ❤︎ Our Patrons

Like what you see here, and want to support future blogging and educational programming? Consider becoming a Patron - click on the button below to unlock exclusive content, bonus blog posts, and more! Every contribution makes a big difference, thank you!