Showing posts with label Embroidery. Show all posts

September 5, 2018

It's Time for a Giveaway!

We just hit 300+ likes on our Facebook page, also The Young Sewphsiticate!  Words simply cannot express my gratitude for every "thumbs up," comment, follow and share our page has received, and I am overwhelmed by your generous support for my amateur sewing, textile and living history adventures.  So to celebrate this exciting blogging milestone, we're giving away a Berlin Wool Work Pincushion!

The giveaway prize - a Berlin wool work pincushion!


The Prize: Worked in a traditional style of needlepoint, this vivacious, Berlin wool work pincushion will certainly stand out in your sewing basket!  The vibrant hues of red, orange, yellow and pink are appropriate for both historical and modern use, making this the perfect addition to your living history and reenacting kits.  

Don't sew?  This also would make a festive decoration, tree ornament, doll pillow, or even gift it to another...I won't tell ;)

Front design of the pincushion.
Note: the colors in the following three images are truest to life.


Hand-stitched using 100% wool yarns on cotton embroidery cloth and backed with black cotton sateen, this little pincushion should hold up through many sewing projects to come! 


Let the giveaway fun begin!


How to Enter:  There are three ways to enter - by "liking," commenting and/or sharing the contest.  Each participant may have up to four entries.   
  1.  Like - Consider giving our page a "thumbs up" or "like" on Facebook!  (Only fitting as this is what inspired the contest)  Let me know in the comments below so I can be sure to count your entry, especially if you're already one of the 300 we're celebrating!  (Counts as 1 entry per person, not repeatable)
  2. Comment - Tell us about your favorite and/or least favorite historical garment in a museum collection in the comments below!  Be it pretty or pretty ugly, inspiring or disgusting, have fun with this one!  (Counts as 1 entry per person, not repeatable)
  3. Share - Spread the word by sharing this giveaway on your blog, Facebook or other social media site!  Make sure to post a link to your share in the comments below.  (Each share counts as 1 entry, repeatable up to 2 times per person)

Just imagine this pincushion in your sewing basket!

The Timeline:  The contest is open now and through the next nine days!  You have until midnight (Eastern Time) on Friday, September 14th to enter the giveaway.

The Winner:  The winner will be selected using a random name generator and contacted on Saturday, September 15, 2018.  The prize is one, handmade, Berlin wool work pincushion:


Good luck!

January 20, 2016

An Update in Three Parts

After a full day's work - chopping 2x4s with the carpentry shop's miter saw, searching for the perfect fabrics in the stash room, and writing an entire argumentative paper - I think it is time for a quick update!  Let's go...

Part I:  A past project!  Three weeks ago, I completed a patchwork pocket to go with my good friend Rhonda's new 1830s short gown ensemble.  Since it was her Christmas gift, I couldn't reveal it on the blog until now:


Made from reproduction fabrics, fully lined and backed with a sturdy linen.  The dressmaker, I heard, approved :)  


Part Two:  A present project!  I'm making a Berlin work pocketbook!  In the down time between classes, homework and the costume shop apprenticeship, I've been relaxing with a row or two of stitches...

The progress thus far...

A couple of weeks before the move, I had picked up a copy of Elsa S. William's Bargello: Florentine Canvas Work for less than a dollar at a thrift store.  Though the book itself was in poor shape, I spent hours pouring over the gorgeous designs within before choosing "Domes and Spires" (page 31) for my pocketbook.  Apparently, the pattern may have been inspired by the dome of the Florentine Baptistery.  


"Magic Lantern" - one of my favorite patterns from the book, and was originally
my choice.  However, I quickly found out that it is not beginner friendly!
Also note that the pictures are the only patterns and directions...

I drove my poor friend Mary insane with my insistence on finding the perfect shades of DMC floss at JoAnns.  However, she worked her magic, and I definitely owe her one!  Several hours (yes, hours) later, we walked out with this rainbow of primary colors that could have been available during the late-18th and early-19th centuries:

DMC floss & 14 count Aida cloth. 

Pink family.

Gold family.

Blue family.

And, hopefully, by the end of the semester, I will end up with a finished pocketbook, like this extant example:  

William Cushings Pocketbook, c.1779.
Museum of Fine Arts
(Image source)

(Make sure to check out my Needlepoint Pinterest Board!)  


Part III:  A future project!  (Or several...called updates to the blog.)  I'm falling behind on blog posts!  For instance, there's a sewing box that has been completed (and photographed) for over two months:

19th century sewing box preview.

Not to mention the 1820s Mad for Plaid photo shoot previously promised:  All of the photographs have been uploaded, and are now awaiting some sorting as well as the written work.


And, best of all, I've been honored with a Liebster Award nomination by the super talented Hannah of Fabric & Fiction fame!  If you don't already follow her blog, make sure to stop by and prepare to be amazed by her Regency wardrobe.  (That striped silk pelisse that she just completed - and blogged about here - simply splendid!)  

Stay tuned for these posts and more to come...thanks for reading!

October 7, 2015

GCV&M's 39th Annual Agricultural Fair

This past weekend, October 3rd & 4th, was the Genesee Country Village's 39th annual Fall Festival & Agricultural Fair!  It promised to be a good one with dozens of activities to celebrate the harvest season - including animal exhibitions, blue ribbon contests, magic and puppet shows, a famed farmers' market, and all sorts of 19th century farming & cooking demonstrations and tastings throughout the village.  And, despite the rather cold-weathered start, it most certainly was!

Field of tall corn stalks behind Eastman's Boyhood Home. 

After having so much fun dyeing with pokeberries, Prussian & Saxon blue at last year's fair, I could hardly wait for what this weekend would bring!


In fact, I entered the blue ribbon contest for the first time, not expecting anything of course, except to say that I did.  With so many spectacular 19th century & 21st century entries - from culinary masterpieces, to horticultural showings, and to domestic and industrial arts of all kinds - I was so surprised and honored to bring home my first two ribbons!  Yippee!

My ruffly 1830s cap, entered under "handsewn article of clothing," DM-18A,
received a bright and shiny red ribbon!

My patchwork pocket, entered under "pieced article of clothing," DM-1,
also received a ribbon! 

Last but not least, I entered my Berlin work pincushion under "needlepoint," DM-34.

Now, having seen so many other gorgeous, inspirational entries, I am eager to enter again next year, what fun!


As for where I worked, I spent Saturday freezing in the Eastman House, the home of the village quilters.  (I would elaborate more on Eastman and the interpretation there, but I am planning to feature each of the buildings I had the opportunity to work in throughout the 2015 museum season in their own, separate posts.  Can you tell that I am in love and obsessed with my workplace?  Stay tuned...)  However, lucky for me, I had the presence of my dearest, cheerful friend & dressmaker to warm me up!

A picture of us both in 30s outfits!
Rhonda's cap & pelerine are just stunning in person!

Sunday had much nicer, sunnier weather, drawing in a crowd of nearly 2000 visitors.  (Including my mom, which was a pleasant surprise :)  I had the chance to try something new and exciting: working with both 19th century and 21st century foodways!  In the morning, I volunteered as an extra set of hands in the Whistle Stop, the onsite, modern kitchen which prepares all of the scrumptious delights from the village's confectionery.  I was immediately put work chopping apples and onions for sauerkraut, learned how to braid bread, and finished my stay by helping make the pumpkin hand pies, yummy!  

In the afternoon, I assisted with the very popular Heritage Chocolate demonstrations & tastings in Thomson Tavern (another building being featured later on).  Between the two demonstrations, I kept the tavern open and talked chocolate for hours - the highlight of my weekend!  

Grinding chocolate nibs on the metate (or "mealing stone" heated by hot coals)
with a mano (Spanish for "hand").

For sure, chocolate is a very relevant, very personal, and very yummy part of practically every visitor's life, so we had a captive audience.  We talked about, well, anything and everything American heritage chocolate related!  Its history...
Like, did you know that the word "chocolate" came from the Aztec word "xocoatl," or "chocolatl," which referred to the bitter drink of their creation, which we would better know as "hot chocolate?"  
Thinking back to early American history, the first people to discover the magical properties of chocolate were the Aztecs, Incas and Mayans.  No really, to the Aztecs cocoa had religious significance, playing part in birth, marriage and death rituals.  Married couples would exchange cocoa beans, which also became a form of currency and acceptable tribute from conquered peoples.  And, in addition to human blood sacrifice, chocolate was gifted to the gods (as well as the victims to cheer them up before death...)
Not to mention they mixed hot and cold drinks from the beans, and even wines from the white pulp of the pods.  The Aztecs really enjoyed their "chocolatl."  So much so that I think Emperor Montezuma literally became addicted to chocolate, perhaps drinking 50+ portions of it daily!

...how it was processed from cocao pod to bar to hot drink, popular additions (spices & coloring)...
Notice the different spices on the table - orange peel, salt to bring out the flavor, anise, nutmeg, cinnamon, vanilla, red pepper (yes, chili peppers & chocolate intensify each other splendidly!), and annatto.  Annatto is the food coloring added to cocoa to turn it from an unappetizing blackish to the rich, chocolate brown.  (It's also used to color cheese!  So, yes, white cheddar and yellow/orange cheddar are the same cheese - we eat with our eyes.)  Also, thanks to Cortez's & European tastes, we add cane sugar (beet sugar today) to our chocolate.

...its significance and availability throughout the early and mid 19th century, and where to get this "food of the gods" today!  (Chocolate literally is the "food of the gods," according to the Latin Theobroma cacao, meaning "cocao tree!")  

Our American Heritage Chocolate display.

Yes, I had a lot of fun (and hopefully luck) selling our American Heritage Chocolate.  Neither our visitors, nor I, could imagine the flavorless world without chocolate, which is becoming a dim reality due to the rampant deforestation in cacoa climate...I really hope they let me talk more chocolate next season!

Seriously, once you've tasted this rich, decadent, American heritage chocolate, you can never go back to plain, old chocolate...too bad it's only sold at select living history museums.  I guess that means when you visit the Genesee Country Village & Museum, you'll have to stock up ;)


Helpful Links for Further Research:

September 29, 2015

To Pin, or Not to Pin...

...That is the question.

To pin, of course!  What a silly question, especially if you have a collection of new pincushions to pin upon!


I haven't posted much about actual sewing recently, only because I'm in the middle of several projects.  CADD (Costume Attention Deficit Disorder) strikes again!  Anyways, one of those projects happens to be a new period appropriate, early to mid 19th century, sewing box.  Usually my sewing supplies are scattered all over my basket (and all over the house), so I think it's time they find a home in one spot...enter the perfectly period, wallpaper covered sewing box:

Here's a period example:

Mid 19th century wallpaper covered sewing box, 4.5" h. by 6.5" w.,
with a pincushion lid and blue floral decoration on an orange ground.
Live auctioneers, Lot 229

And here's mine: 

Reproduction wallpaper covered box, 8" by 8"
Courtesy of C. LeCount, thank you! 

With the pasteboard band box acquired, the next question is what to put in it?  So I turned to Anna Worden Bauersmith's blog, If I Had My Own Blue Box, for answers!  Anna is definitely a star in the historical sewing world, known especially for her excellence in millinery & sewing accessories.  (I've even had the privilege of meeting her in Mumford!)  Make sure to order a copy of her latest and greatest, Fanciful Utility: Victorian Sewing Cases & Needle-books, and go follow her blog, if you don't already!  Seriously, both are outstanding resources.  

After a few searches there, I came across the best blog post I've ever read on all things sewing box related: What is in Your Sewing Box?  Not only does Anna share some great period resources on work boxes, but she details her own sewing box and basket, as well as two of Bevin's (which I've seen and even used in real life - yup, perks of being her intern!)  All of this together has proven most useful in assembling a sewing box of my own!

While still a work in progress, my next step is to create some sort of insert with dividers for the inside.  These are the fabrics I've chosen to use:

Two period calicoes, light green silk & chocolate silk.
(For some reason the coloring is funky in this picture...)

In the meantime, I have started to acquire a decent collection of pincushions and sewing accessories to fill my sewing box!  (Probably thanks in part to my Sewing Accessories Pinterest board.)  So, without further ado, onto the pincushion fun!


Number One:  Round cloth pincushions.  

Historical inspiration:

"Pincushion by Fanny Waddell made from material brought during the blockade from England and printed with the pattern of the Confederate second national flag, which was adopted in May 2, 1863" - North Carolina Museum of History
(Image via: https://www.pinterest.com/pin/404409241517786270/)

Pincushion collection: "six tomato pincushions in silk, velvet, cotton, multi-color floral patterns, and silk plaid...scallop shell with red silk interior...gold silk covered disk with red velvet interior."
(Image via: http://www.willishenry.com/shaker2011/shakcat2011.htm)

My version:  These aren't new by any means, but are my tried-and true-pincushions, which have accompanied me to work for the past two seasons.  I couldn't imagine my sewing box without one!


Number Two:  A Berlin work pincushion.

Ever since my brief introduction to needlepoint, thanks to my friend and fellow coworker, Judy, I've become obsessed!  (Needlepoint Pinterest Board)  Hopefully, more projects to follow...


Measuring a little over 3" by 3", the square features five different crewel wool yarns in a chevron-like pattern.  Backed with silk, flat-lined with cotton muslin, and embellished with handmade cording.  Such a fun, little project!


Number Three: A scalloped sea shell pincushion.  

Historical inspiration:

A trio of antique sea shell sewing pincushions, possibly Shaker.
According to the seller: "[Each] are fashioned from two shells that are hard-stuffed with velvet.  Similar pincushions made from scallop shells were made and sold by the Shakers in the 1880s from shells collected along the Maine shore"
(Image via: Etsy shop - AmericanaAntiques)

My version:


While my inspiration had two matching(?) shells, and originally my reproduction did as well (until one was stepped on), the finished pincushion features just one scalloped sea shell with a red velvet interior.  I have also seen similar historical examples using just one shell.  


And, it just so happens that Anna Bauersmith has a fantastic article of her own on shell pincushions and recreating them:  Shell Pincushions.  Go check it out!


Number Four: A basket pincushion. 

Historical inspiration:

Antique Sterling Silver Basket Pincushion, c.1800, England.
(Image via: Ebay seller - toys4boysandgirls12)

My version:  Constructed using a small, woven basket and silk, flat-lined with cotton muslin, for the cushion.


Number Five:  A button & thimble drawstring keep.  

While not exactly pincushions, I couldn't resist the opportunity to share the button & thimble keep I made for my sewing box!  Both circular keeps are fully lined and close by embroidery floss drawstrings.


Perfect for keeping antique china buttons, thimbles & mother of pearl buckles safe.

Well I'm off to fill my box with plenty more sewing goodies!

Scissors large and small, spools of thread, bone instruments...
all I want now is to find some nice bone or wood thread winders!


But, first, here's a bonus peak at my latest short gown study:


I have high hopes of finishing this outfit in time for September's Historical Sew Monthly Challenge, but another, spur-of-the moment project is taking my attention away from my entry...Thanks for reading!

August 5, 2015

A Month in the Life of a Wannabe Reenactor

Happy August, everyone!  If you were hoping for an update on sewing, or even perhaps my overdue July HSM challenge entry, I apologize as you'll have to wait until the next post...Tonight, I have a not-so-secret confession to make...there is nothing more that I want to be than a reenactor when I grow up!  There is just something so special about donning the clothing and living the past in the present that appeals to me.  Therefore, it only makes sense to work at a 19th century living history museum!


This summer is my second season as a historical interpreter at the Genesee Country Village!  Even though I am no longer an intern, I am still keeping plenty busy onsite learning, teaching and connecting with the public through the increased opportunities afforded as a full-time interpreter.  I absolutely love working the special event weekends and theme days.  Best of all, I can say that I've truly done some "growing up" through a few tough lessons - no workplace is perfect.  However, now, I am facing the challenges with more confidence in knowing that I have strengthened existing and forged new friendships with some really wonderful people.

Anyways, without the internship journal, I've missed recording and sharing my favorite memories from the museum.  So, tonight, I just thought it would be fun to catch up on some of the highlights from the past few weeks!


Starting with Civil War Weekend...Saturday, July 18th, shots rang out once again during Mumford's annual Civil War battle & encampment.  I was so happy to be asked to work the day - running around and helping wherever needed.  From reenactor registration, to soapy fun with the children's laundry station, to battlefield crowd control, it was definitely a long & fun day.  Topped only by the evening's ball, of course!  Ava was so very kind to lend me her pink-striped sheer gown - it was so ruffly and twirly and gorgeous that I felt oh so pretty!

Photograph courtesy of Pat Mead.

For the day, I sported my best working class impression!  I also learned to dress my hair differently and really like the result...

Hair shot!  Yes, that is all real...

A gathering before the ball.  It's the only picture I can find of Ava's pretty, pretty, dress.  It had tiers of ruffles along the skirt hem & open pagoda sleeves:

Photograph courtesy of facebook

Sunday, July 19th, was day two of Civil War weekend.  I had the chance to have my tintype taken with my museum "twin," Ariana, which was super exciting! 

For the day, I was the substitute at George Eastman's boyhood home, which is also now the home of the village quilters.  I have come to really enjoy interpreting in there, especially when I can send children on scavenger hunts.  I usually ask them to look for five items: a bathtub (in the kitchen), a picture of a little boy (a copy of an original daguerreotype of Eastman at age four), a chamber pot (with its matching applique quilt), and two pieces of "transformer" furniture (a rocker that also serves as a baby cradle & a side table that becomes a ladies' writing desk and seat).  Not only does this fun interpretive strategy capture the attention of all ages, but it also serves as an effective tool to launch into the greater stories of Eastman's biography, the building and its furnishings, as well as 19th century life in general.  

Eastman front parlor.

Eastman side bedroom with applique quilt top. 

In fact, I've been picking up quite a few extra days at Eastman over the past couple of weeks!  While, unfortunately, I'm not a quilter, I have been enjoying putting together several Berlin work pincushions as part of our crafts in the village program.  Judy, a fellow interpreter and friend, did all of the fabulous needle work, so all I had to do was ooh and ahh as I stitched them together and added the cording.  I learned how to make single and double colored cording, which is very similar to plying in spinning.  (Definitely an embellishment that would be fun to use on future projects!)

A few Berlin work pincushions!

Muslin backs with view of decorative cording.

I liked what Judy did so much that I asked her to teach me how to do Berlin work too.  Lucky for me, she obliged!  So, I went to the local(ish) second hand craft store and picked up some Aida cloth and crewel yarn:


And, after a couple of hours of stitching, here is my first attempt at Berlin work!  It's so much fun and even easier than counted cross stitch.  Judy showed me some clever tricks for avoiding making knots and keeping the back as neat as the front.  She's so sweet, and I definitely see more Berlin work in my future...


In the mean time, we interpreters celebrated our mid-year party, signifying the half-way mark of the season!  Already.  We could not believe it.  Despite being there just about every day, it seems like the season had just begun!  My museum friend, who I fondly call Lady Mary, and I brought a cake that nicely summed up what we're all about:

Museum interpreters...Valid Victorians since 1837!

A turtle rescue also happened.  My sister and I stumbled across the cutest, little painted turtle that needed to be rescued from our land of concrete and returned to a more hospitable pond...live long and prosper, little turtle!


Back to the museum events with the second annual Christmas in July theme day held on Saturday, July 25th!  It was my regularly scheduled day in the Foster-Tufts House with three exciting activities scheduled: a make-your-own sweet bag station, me (supposedly) making pin cushions as Christmas gifts, and dyeing with onion skins in the backyard.

Yours truly working on Berlin work pincushions at Foster.
Photo credit: Sarah Ledke
(via: facebook)

Because the sweet bag activity was such a hit with visitors, the pin cushion making turned into a static exhibit of my in-progress projects and sewing supplies! 

Photo credit: Ruby Foote
(via: facebook)

The sweet bag activity was based of an original "receipt" or recipe that was published in the May 1864 issue of Godey's Lady's Book.  It called for an ounce each of whole cloves, cinnamon and lemon peel, two ounces of lavender, and a pinch of oris root.  The ingredients were then "bruised" or mixed using a mortar and pestle, wrapped up in the center of a Christmas fabric square and tied off with a pretty ribbon.

Whole & crushed oris root with lavender oil -
to serve as an activator and fixative for the sweet-selling scents.  

Cloves, lemon peel, cinnamon & lavender.

Overall, it was a very successful (and busy) day with plenty of takers for the sweet bag activity!  I enjoyed working with all of the children and adults, especially my most memorable guest of the day - the sweetest blind child with several other disabilities - interpreting and helping him with the activity was such a humbling experience.  

Photo credit: Ruby Foote
(via: facebook)

Speaking of Foster and regular interpretation days, it has been such a pleasure to interpret in there as the home of the spinners.  While I am unable to demonstrate spinning, I have been able to put to use what I learned during the "experience days" of my internship by talking in depth with visitors about flax and wool processing.  And now, with the wedding display, I am having so much fun talking about 1830s fashion inside and out! 
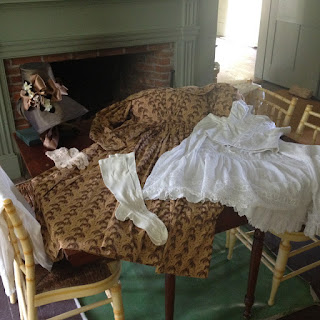
Did you know that it was Queen Victoria who popularized "white" as the color of choice for wedding gowns?  Otherwise, a bride's gown was historically a best dress in a more practical color.

More close-ups of the wedding gown display: 

The Timely Tresses bonnet I wear quite often in Foster.

Look at those gorgeous, intricate details on the silk stockings & petticoat!

Beautiful, hand-stitched long stays!  In fact, I will be making a pair of my own later this month - much more on this fun to come!

Corded, long stays - front.

Corded, long stays - back.

And finally, this past weekend was the annual Laura Ingalls Wilder Weekend!  Saturday, August 1st, I had the opportunity to be Freda's dyeing assistant -   whoohoo!  It meant a very busy day of work, but I had a splendid time experiencing 19th century dyeing again and studying with such a fiber expert.  The dyes of the day included cochineal for a deep purple and indigo for both blues as well as an over-dyed, forest green.

First, the wool squares (for rug hooking) and yarns had to be prepared for dye in mordants.  The "dingy" colored skeins were simmered in a chrome mordant:


Some of the skeins were dyed with cochineal for a deep purple.  Interestingly, the dye bath required about an ounce and a half of cochineal to be extracted.  


Dyeing with indigo, as I found out, is a multi-dip process.  The yarn sat in the dye for about 20 minutes, and then it was removed to drip dry before re-soaking in order to deepen the color.  Care was taken to avoid too much oxygen exposure as the yarn appeared green in the dye pot and "magically" oxidized in the open air to turn blue.

Green or blue?

Tropical indigo leaves are collected and fermented.  Then, pressed into a solid "cake," the leaves can be used as a permanent "dye."  We also over-dyed the yarn previously colored with onion skins (produces a yellow) with indigo to create a dark forest green.


The day's dye results!

Sunday, august 2nd, Ariana and I ran the children's games all day, which included plenty of sack races, both egg and pig bladder (water balloon) tosses & tug-of-wars against people.  Exhausting, but the children were great.  Though, the best memories were made at the end of the day when we were up to our usual antics...double egg tosses?  Yes! Perhaps even triple and quadruple pig bladder tosses?  Certainly.  And, a classic - water balloon tossing, duel style.  What a rewarding end to a long day!

Sunset in the village.

Wow!  Sometimes I am just amazed by how much can be done within just a few weeks...See what fun interpreters at the Genesee Country Village have?  If you're ever in the area, make sure to come visit us!  And, feel free to shout "hi" if you see me around the village!

We ❤︎ Our Patrons

Like what you see here, and want to support future blogging and educational programming? Consider becoming a Patron - click on the button below to unlock exclusive content, bonus blog posts, and more! Every contribution makes a big difference, thank you!