
"FANCY HAIR WORK of the latest NEW YORK Fashions consisting of Rolls, Puffs. Ringlets, Madona Bands, etc. Also Wigs, Toupees, and the patent Crown Toupee, which is so becoming to the wearer that even the most critical observer would take it to be the natural head of hair." - Geneva, June 15, 1831
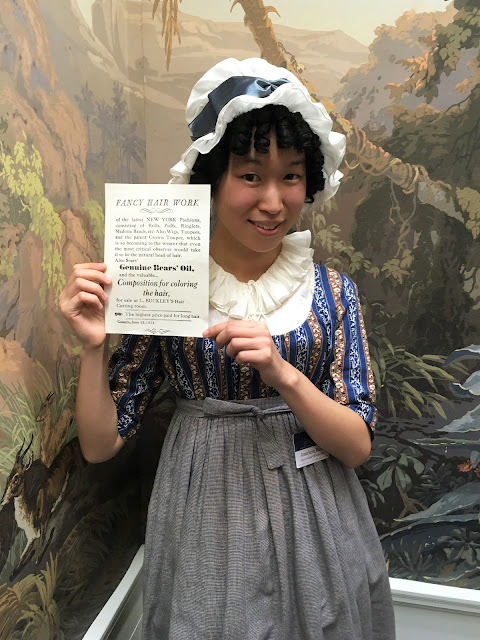 |
| A Do-It-Yourself Tutorial for Clip-In Hair Ringlets: "so becoming to the wearer that even the most critical observer would take it to be the natural head of hair" |
My goodness, it's been ages since I've written a blog post...so long so that Blogger has completely changed it's look and publishing tools. The other day, I was chatting with a friend (and fellow costume blog enthusiast) via a zoom conference, and felt inspired to both dig out a sewing project and to write a blog post - a double win, especially since I've been practically silent on all but Instagram these days!
Anyways, if you still happen to read this little blog, please enjoy this short tutorial on making clip-in hair pieces for your historical hairdos!
DIY Clip-In Ringlets for Historical Hairstyles
My ringlets have been known to fool people...Anna asked about them in my 1830s hairdo, Kristen questioned why my curls hadn't dropped after a full day in an 1810s style, and I've even used them in several 1860s hairstyles. For those of you who've seen my hair down - it's long (kept between waist and classic length), stick-straight, thick, and heavy - but most of all, no way going to keep a curl! So, I've turned to making false hair pieces to supplement my natural locks.
Even for those blessed with tresses that will hold a curl or magical hair-styling abilities (both of which passed me over), clip-in hairpieces are easy and period accurate - as it reads in the 1831 advertisement above. Even in the worst humidity, they will stay in for the whole day, and can be restyled when unclipped at the end of an event. To get started, you will want to gather the following materials:
Materials
 |
| Gather your materials: hair wefts, rollers, rubber bands & bobby pins! |
- Hair wefts - choose either real, synthetic or a blend of the two to match your natural hair color. (Mine were a cheap-ish blend purchased from Sally Beauty Supply)
- Hair rollers - not going to lie, I just used the $1 plastic ones...
- Optional: curling papers for stubborn hair ends (I may have used toilet paper squares long before the current shortage haha)
- Small rubber bands and/or bobby pins to secure the hair/hair rollers
- Pot for boiling water + tongs
- Comb for detangling hair
- Wig clips (unless you simply wish to pin your hairpieces during wear)
- Scissors - both for trimming the hair and for thread
- Needle and thread - select a sturdy, matching thread if possible (I used button twist, but doubled sewing thread will probably work just as well)
Directions
Part 1: Preparing the Hairpiece
- Decide on the desired width for your hairpiece. I chose one inch for a single sausage curl and 5" for a strip of curls, which were intended to be used for both Regency-Era front bangs and Romantic-Era "spaniel" or side curls
- Cut a hair weft 2 - 2.5 times longer than the desired finished width. This allows for a more voluminous sausage curl.
- Fold the hair weft in half, making sure to fold the cut edges towards the middle to disguise the unfinished edges. Stitch through all the layers to bind them together. And now you have a hairpiece ready to curl!
Part 2: Setting the Curls
- Once you've prepared your hairpieces, take a section of the hair and wrap it around a roller. Curling papers are optional, but do help to control unruly ends. As I mentioned in the materials list above, I just used cut squares of toilet paper cause I'm a broke college student...Secure the hair roller with rubber bands/bobby pins as necessary

Hair wefts - sectioned and secured around rollers - Repeat until all of the hairpieces are sectioned and secured in rollers.

I repeated the process more than once... - Bring a pot of water to just about boiling. Using tongs (unless you're very adventurous), submerge the hairpieces and allow them to soak in the pot for around 30 seconds.

Into the boiling water! - Remove (after no more than 30 seconds, folks, especially if you're using cheap plastic curlers and synthetic hair wefts(!) or you'll have a melted mess on your hands instead of nicely curled hairpieces). Allow the hairpieces to dry completely before styling.

Laying out to dry in the sun for a couple of hours
Part 3: Styling & Finishing
- After allowing ample drying time, which for me was a couple of hours out in the sun, remove the hair rollers. Detangle the hair, either with your fingers or using a wide tooth comb.

Removing from the rollers - Style the curls by smoothing, trimming, and clipping any fly-aways as necessary.

Ready to tame the curls... 
...much better! - To finish your hairpieces, I recommend attaching wig clips. These can be sewn directly to the top of the hair wefts. I used 2 per "bang" or hairpiece, positioning a clip on both the far right and left sides.

I recommend stitching on wig clips for ease of wearing 
Wig clips attached!
Part 4: Wearing & Storing
- Once your hairpieces are styled and finished as desired, simply clip them in place and you're all ready to rock them at your event! Lightly hair-spraying your real (and fake) hair together should help maintain the curl.
- If you're not going to don your newly-completed hairpieces immediately, I recommend gathering the curls with a bobby pin and giving them a light misting with your favorite hairspray or setting product. Then, right before your event, remove the hairpins and they are ready to be clipped in!

Gather curls with bobby pins and mist with hairspray to set - Boiling synthetic fibers should permanently melt the curls in place, so I've been able to use and re-use my hairpieces without having to re-curl or style them. However, I do recommend storing them flat if possible between wearing - enjoy your new, curly clip-ins!
 |
| Completed set of side bang, clip-in ringlets! |
With your completed DIY clip-in ringlets, the historical hair styling options are limitless! Here are just a few ideas to get you started:
 |
| Full front bangs for an 1810s look at the 2019 Domestic Symposium |
 |
| Rocking the 1830s side bangs during the "Get Dressed with Me" program at the John L. Wehle Gallery, and yes, that's an original, antique pelerine! (Photograph by Brandon @l_aspect_ancien) |
 |
| Okay not the best photo of me, but it shows the same hairstyle as above, taken the morning before the gallery program |
 |
| A single, side sausage curl blends seamlessly with my real hair for this fun, 1860s summer photoshoot |
 |
| 1860s evening hairstyle for the 2020 Ohio Regimental Military Ball |
If you try this tutorial, let me know how it worked in the comments below, and better yet, share a picture or two of your historical hairdos! Make sure to tag me @youngsewphisticate on Facebook/Instagram so I don't miss a thing -
Thanks for reading!

Thank you for the tutorial on how to make my own. Yours look fantastic!
ReplyDeleteThank you, Deanna!
DeleteFunny, I was just thinking yesterday that I want to make some fake curls for reenacting. Thanks for the tutorial!
ReplyDeleteThey are really useful, trust me! ;)
DeleteI needed this! Thanks so much!
ReplyDeleteYay, thanks for reading!
DeleteI have grey hair and can't seem to find curls in the right color for some of the more elaborate Victorian styles but I have a fall that is perfect. I am going to use your tutorial to turn it into banana curls.
ReplyDelete